
Demystifing the trem: How to set up your floating tremolo
 4,5 / 5,0 |
Demystifing the trem- Set up your floating tremolo system, fast and easy · Source: Gear News/Jef Stone

Guitar not returning to pitch after using the tremolo? Or is the tuning going bad after extended use? If that sounds familiar, it might be time to set up the floating bridge on your guitar. This can be a difficult and frustrating ordeal, especially if you don’t do things in the correct order. But if you follow these simple tips, you’ll be setting up your own trems in no time! All you need are a few basic tools and a quiet, clean area to work on your guitar.
Know your tremolo
So why do we need to set up a trem system? Well, it can be very frustrating to play a guitar that keeps going out of tune every time you use the whammy bar. It’s uninspiring, and is disastrous in live situations. But fear not! Setting up a trem bridge is easier than it looks, and with a little patience and the right tools, you’ll be dive-bombing in no time!
First, identify the style of trem bridge on your guitar. There are several variations of the vibrato/tremolo style bridge. However, the more popular ones are based on the vintage-style 6-screw trem bridge, the PRS-style floating bridge, the modern 2-point Fender-style trem and the Floyd-Rose style trem.
Other tremolo systems like the Bigsby, Jazzmaster-style trems and the inspired Gibson Vibrola, are usually only ever found on vintage instruments and reissues. I’ll cover how to deal with these in a separate article, though, to keep things a bit simpler here.
Sometimes the nomenclature is a bit puzzling, too. Even though the effect produced by a floating bridge is called vibrato, Fender erroneously used the term tremolo for the bridge on its brand new Stratocaster guitar way back in 1954, and the confusion has persisted ever since. Therefore, keeping with tradition, we’ll carry on using the word ‘trem’, but you can change that to ‘vibrato’ in your head, if you like.
Floating Tremolo Setups

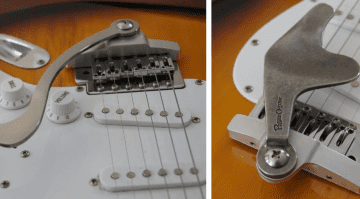
Posts on a 2-point trem · Source: gearnews.com
This is my basic process to set up two-point floating trem systems on all my guitars, and it works pretty well. If the trem system uses more than two trem posts (the screws or little metal barrels that keep the bridge in place, see image) like PRS trem systems and vintage Fender-style six-screw bridges, then all six of the screws used to hold the trem in place need to be at the same height. If these are not all at the same height, it will cause issues with your tuning. Fender-style vintage trem systems aren’t quite as picky, but don’t truly float as well as modern trem systems.
When working with Fender-style 6-screw trems, some people will take out the middle four screws, or raise them slightly, effectively converting the 6-point trem into a 2-point trem. Keep in mind that raising the middle screws can sometimes cause problems, as the baseplate of the bridge can get wedged into an odd position on the screw threads and make the bridge wonky.

Some of the basic tools I use to set up a guitar trem system · Source: Gear News/Jef Stone
Tools Required
- Guitar Tuner
- Adjustment Hex Keys
- Screwdrivers – correct size for your trem
- Post It Notes
- New Guitar Strings
- Wire Cutters
- String Winder
Optional Extras
- Sewing Machine oil
- Nut Sauce or guitar nut lubricant
- Pencil
- Fine needle files
- Brasso
- String
- PTFE/plumber’s tape
Get the right tools for the job
A decent set of the correct size tools for your guitar will make this job much easier. Something like the Harley Benton Guitar Toolkit * contains just about everything you will need to do the job. I also use a TC Electronic PolyTune * when checking my tuning.
Using the correct tools for the job is extremely important, otherwise there is a huge risk of damaging the components of the bridge. You don’t want to have to replace the whole thing. You will also need a fresh set of strings, as old strings will not provide the required tension and will cause problems while calibrating. And this may sound obvious, but make sure that your workplace is uncluttered, so that you can get the job done properly.
One step at at time
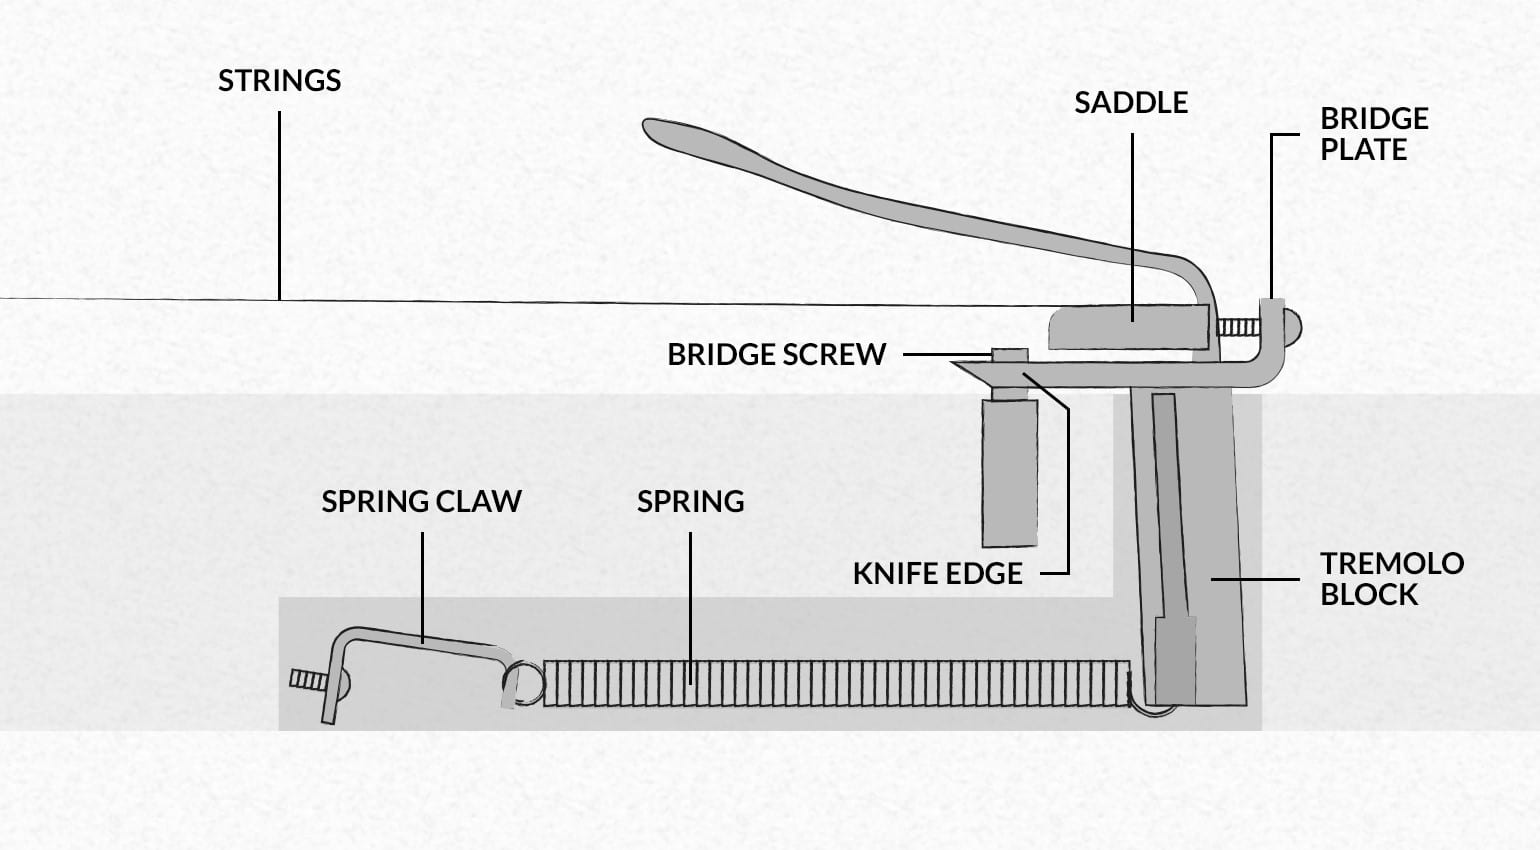
Diagram of a typical tremolo set-up · Source: gearnews.com
To set up the trem, let’s break down the process into three easy parts:
- Checking for mechanical faults
- Adjusting intonation
- Floating the trem
Check your mechanicals
Before changing out your strings, the first thing you will need to do is to look for any mechanical issues. Use your ears and sense of touch to feel for any clunks or notches in your guitar’s trem system. If a component doesn’t feel smooth to the touch when using the trem, it’s a problem that needs to be addressed before going any further.
Common mechanical issues are loose tremolo arms, notches on trem posts or worn blades on the tremolo baseplates. If a trem arm is loose, I often use PTFE, sometimes known as plumber’s tape. Just wrap a small amount around the trem arm and re-insert it. This will usually do the trick. Of course, the tremolo arm has to be the correct one and correspond to the type of bridge installed. For example, you might have trouble trying to use a Floyd Rose arm with a PRS bridge.
With damaged trem posts, you are normally better off buying a new set. Trying to fix them once they’re notched is usually not worth the trouble.
Sorting out worn blades (the part of the baseplate of the bridge on 2-point trem bridge that makes contact with the trem posts) is a relatively easy fix. You can re-sharpen most trem blades using a good quality needle or small file to remove any burrs in the metal.
New strings
Once you’ve sorted out any mechanical issues, you want to put a fresh set of strings of your chosen gauge on the guitar. They need to be fully stretched in and tuned to pitch.
This all sounds obvious, but if you don’t follow these simple steps, then you are heading down the wrong path and you’re going to have a bad time. Make sure you know what string gauge and tuning you want to use before you start setting up the trem, otherwise you will need to set up the trem all over again.
Now on to the intonation
Now that you have a fresh set of strings, you can go to the next step: adjust your guitar’s intonation for each string. I know a lot of players get a bit stressed out about it, but it’s really pretty simple.
The intonation refers to the guitar playing the correct notes across the fretboard. It needs to be adjusted for each string and can be done by moving the bridge saddles either forward or backwards.
Here’s how: Tune the lowest open string to pitch and then play it, or, for a more accurate reading, play the 12th fret harmonic (barely touch the string over the 12th fret and pluck it). Now, depress the string at the 12th fret and compare the two pitches. It’s a good idea to use your guitar tuner to check the tuning, as it will provide more accuracy than an untrained ear.
If the fretted note is flat, make the string shorter by adjusting the bridge saddle towards the neck. If the fretted note is sharp, adjust the saddle back away from the neck. A good trick to remember which way to adjust can be memorised by this phrase: “flat/forward, sharp/back”. When adjusting the saddle, it’s good practice to detune the string. A string tuned to pitch has a lot of tension and you could end up ruining the intonation screw.
Retune the string, re-check the intonation and then repeat the process for all six strings.
Lubrication
If your guitar trem system is dusty and dirty, then you should clean it now using a soft cloth and remove any old grease or lubricant that could cause buildups of dirt and residue.
A floating trem is a mechanical system and will require regular cleaning and lubrication. I use sewing machine oil, which you can buy online for very little money. I put a small amount onto any moving parts, to help relieve any friction.
You can also use a product like Big Bends Nut Sauce * in the nut slots and string trees which your strings pass over or under. Again, this helps relieve any friction points, which will help with tuning stability.
The ghosts in the trem
If you hear any pings when using your trem system, it might be because a string is getting caught somewhere in the nut or string trees. In this case, you may need to clean, lubricate or even re-cut your guitar’s nut.
To polish the nut slots on my guitars, I use a piece of frayed string and a little Brasso. The Brasso has a tiny amount of abrasive polish in it, and the string, when unravelled and frayed, acts like a thin string-shaped polishing cloth.
You can also use pencil lead to lubricate nut slots, since it is made out of graphite, which acts as a lubricant for strings. However, I would recommend products like Nut Sauce over the graphite dust from a pencil, as it tends to stay in place and work better. I also have my own concoction of mixed graphite dust with petroleum jelly (Vaseline) that I apply to the nut slots with a cocktail stick. It works really well, but can be a little messy!
Balancing your tremolo
Now you’re ready to get floating! The art of getting a floating trem to work correctly is all about balance. You are attempting to make the springs in the rear cavity of the guitar counterbalance the tension of the guitar’s strings when they are tuned to pitch.
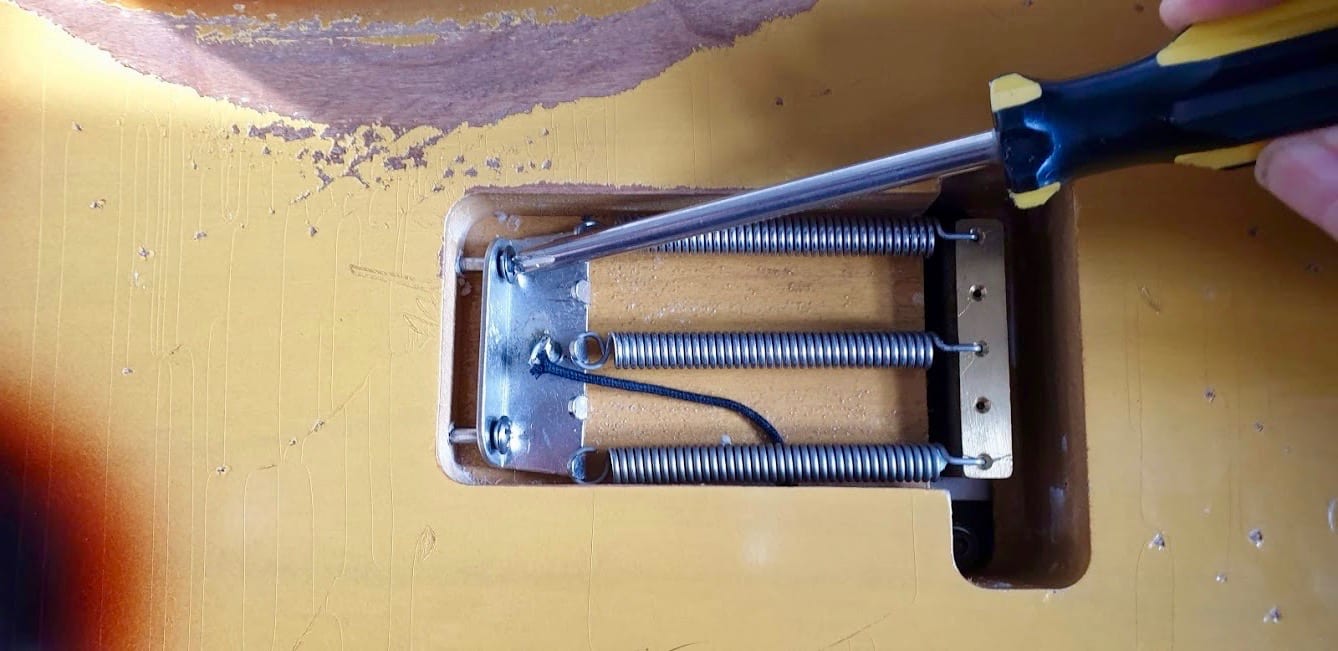
Adjust your trem springs to counterbalance the tension of the guitar’s strings · Source: Gear News/Jef Stone
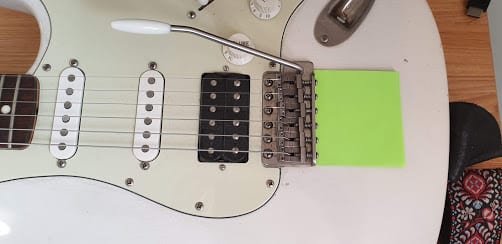
Post It Notes
One challenge is to get the trem height exactly right. In an ideal world, as far as modern 2-point tremolos or PRS-style trem bridges are concerned, your trem baseplate should be parallel with your guitar’s body. Your trem posts will set the overall height of your trem and you can then fine tune this using the bridge saddles (or shims on a Floyd Rose-style locking trem system).
Vintage-style bridges will be at a slight angle, as they are not truly floating, with the back raised some 3-6mm, while the front is making contact with the body. Some players prefer these trems flush with the body, others prefer them half floating, while others still will block off the trem entirely. All this can be done easily by adjusting the tension in the springs in the tremolo cavity in the back of the guitar. This is where the springs and the claw with which the springs are held into place is located.
To set up the height, I use Post It Notes. Don’t laugh, these are a cheap way to achieve the perfect trem height for the baseplate. You just place enough in the gap to keep the back of the trem baseplate in position whilst you tune up your strings.
A 6-point Fender trem. I use Post It Notes to get my trem height just so. · Source: Gear News/Jef Stone
Now string up your guitar with a fresh set of strings and then tune them up. Remember, you need to fully stretch out your guitar strings and keep re-tuning until they hold tune. This procedure will possibly make your trem lift up into the air. If this happens you will need to screw in the back claw that adjusts the trem springs to counteract the string tension.
You are aiming for the strings and the trem springs to reach an equilibrium. They should both assert the same amount of tension to hold the trem where you want it. Again, this is why you need to use strings that are fresh and fully stretched out. Older strings won’t hold their tension too well, and all the grime and dust makes them unreliable.
If you are unsure about how high your bridge should be floating off the body of the guitar, a quick internet search for some online dimensions and specifications on the model of bridge. That will usually lead you to the manufacturer’s recommended measurements.
You will often find that you need to repeat the tuning, string stretching and spring adjustment a few times to get the perfect balance. This is normal, so expect a few rounds of the process. Guitar strings will stretch and you need to account for this stretching in time that occurs.
Locking Trem Systems
With a Floyd Rose or Ibanez Edge style locking tremolo system, the process is almost exactly the same as above. The key difference is that you will need to lock the nut down to finish off the process.
Once you do this, you might find that your guitar has gone slightly sharp. This can mean that the tension bar above the locking nut wasn’t low enough and so as you locked the nut, the strings have gone up in pitch.
To avoid that, make sure the tension bar is low enough to keep the strings in place. It is the bar with two screws that is placed behind the locking nut and its job is to keep the string tension where you want it.
If your guitar’s tuning is only slightly flat or sharp overall across all the strings, then you can actually tune the whole guitar by adjusting the spring tension from the string claw in the rear trem cavity. Tighten it to sharpen the pitch of all the strings, or loosen it to lower the pitch of them all. This can occur if the locking trem system wasn’t quite balanced and can save you from using your fine tuners on the rear of your locking trem to fix the minor tuning inconsistency.
Any comments? How did you get on? Let us know in the comments section below.
*Affiliate link


This might also interest you


6 responses to “Demystifing the trem: How to set up your floating tremolo”

You are currently viewing a placeholder content from Facebook. To access the actual content, click the button below. Please note that doing so will share data with third-party providers.
More InformationYou are currently viewing a placeholder content from Instagram. To access the actual content, click the button below. Please note that doing so will share data with third-party providers.
More InformationYou are currently viewing a placeholder content from X. To access the actual content, click the button below. Please note that doing so will share data with third-party providers.
More Information
Nice article…BUT and it’s a big BUT ! I am amazed at how many people skip or don’t realize THE FIRST STEP of setting up a floating trem ….which is…..the very most important first step of all. String Torque at A440. To put it simply……STRINGS are SPRINGS right ? They bend and stretch and then return to shape. The idea is to have them all return at the same time right ? So…get a D’Addario string chart ( or whoever’s ) and look at the torque settings of the strings at A440. Match them as closely as you can. This is the very first thing you do when setting up a floating trem. Don’t automatically blame the nut or saddle. 9 times out of ten, tuning problems occur because your strings are returning at a different rate. When you release the trem, the strings actually ” Re-set ” themselves. So if you have wide spaced torque settings, when the strings return to ” reset” they’re actually in a new position. Like how a non cut string will work it’s way back through a tuner post. I can’t emphasize this enough. Everything else you said was great. Try matching your string gauges. It makes a huge difference to stable tuning.
Sometimes, I don’t tune to 440 and often I’m in non standard tunings, so I would say whatever strings you choose, just make sure you properly stretch them, in before you attempt to set up a floating trem. On the whole I agree with where you are coming from.
Another important and something that shouldn’t be understated is “making sure that you know what you are doing or about to deal with”. I can’t begin to tell you how many people have all but ruined a trem system by not knowing anything about it before they begin trying to “fix” it.
The main reason I am mentioning this doesn’t have to do with breaking or ruining the trem itself. People forget that there are certain things that once ruined either can’t be fixed or can cost a lot of money to fix them. Almost all of those things have to do with the trem part that go into the guitars body. Like the studs that most trems float on. Those are probably the thing that get ruined the most and require a professional to fix. Especially if the wood gets stripped and they no longer will stay in place in the body. People need to be careful when adjusting these. Especially the ones that go directly into the body rather than an insert which will help avoid this problem.
Also take time to notice where you are setting your tools. It only takes a quick glance to make sure you’re not ruining you finish by not paying attention to where you set your tools.
Super helpful post. Also feel some of these comments. My problem at the moment is that I have a fairly new Reverend DAW Warhawk…and it makes a weird low-end buzz from the Wilkinson WVS50 IIK trem esp when I play the low E or A. I set about trying to fix it…and quickly realized it wasn’t simple.
After reading this article, it seems like I need to adjust the spring claw so the trem is at least parallel to the body. I also get some string buzz so I’m thinking the action overall is too low. Had it shipped to Louisiana from NYC…so maybe humidity messed with it a bit. What do you think?
Humidity/Temperature changes will certainly mess with a neck in terms of making it move. I would check neck is straight, add any relief you need, and then work back from there. Of course, let the guitar acclimatize first, before undertaking any work.
I would note the Reverend has a roasted maple neck so should be super stable, or so we’re told anyway.