Mic Placement: Get The Most From Any Sound Source
Learn about microphone positioning to improve your recordings.


The understanding of mic placement is one of the most important aspects of acoustic recording. We look into techniques for getting the best results.
Key Facts about Mic Placement:
- A microphone’s position in relation to the sound source can affect its clarity, tone, and depth more than the choice of mic and equipment in the recording chain.
- By adjusting the distance between the mic and the source, we can control the amount of room ambience being captured and change the tonal balance.
- Shifting the angle of the mic diaphragm can change the high-frequency response. We can use this like a pre-recording EQ with on-axis placement for detail and brightness or off-axis placement to reduce harshness.
- Phase issues and cancellation can occur when we use multiple mics on the same source. To avoid this, we can use the 3:1 distance rule and check the recordings in mono.
In this Article:
The placement of a microphone is the first step in the recording signal chain. Naturally, our choice of microphone is essential, but some of the greatest recordings have been captured with the mic that happens to be plugged in. Before we shape the signal with compression, EQ, or a myriad of plugins, positioning the mic can drastically affect the clarity and detail of a sound.
What’s more, we can alter a source tonally and adjust the amount of ambient room reflections by pulling a mic further away or pushing it closer to the source. On its most basic level, the position of a mic can determine the auditory vantage point of the listener, which becomes more important as we deal with increasingly complex sound sources.
Mic Placement: Why Does Positioning Matter?
We can affect a signal in so many ways with mic choice and the recording chain that may contain characterful preamps, compressors, and digital converters. However, because the position of a sound source is fixed during a recording, the placement of the mic becomes a part of the performance from a finite perspective.
As any experienced engineer will tell you, a well-placed SM57 will capture a better recording than a badly positioned high-end mic. In this instance, I like to compare microphones to camera lenses as the tools used to focus an image. Even the most expensive ZEISS lens can capture out-of-focus imagery without a proper understanding of the equipment and depth of field.
Similarly, we can use mic positioning as a technique to bring the details of a sound source into focus for our listener. Of course, this perspective also introduces other characteristics and determines aspects such as phase relationships, tonal balance, and room reflections. Overall, this discipline can shift our “fix in the mix” thinking to committing to the right sound at the source instead.


Mic Placement: Starting with the Source
Before we start moving mics around, we need to ensure that our source sounds as good as it possibly can in the recording environment. This involves thinking in terms of the music genre we’re working with, listening to the instrument from multiple positions, and possibly even choosing a different room if we have the option.
Finding the optimal position or “sweet spot” depends on the type of instrument, room, and musical context, so keep this in mind and go for a balanced, natural sound. When dealing with a guitar amp, for instance, the famous producer Butch Vig turned up the amp until the noise became clearly audible in the headphones. He then probed around with the mic until he found a spot with a nice balance of midrange and high frequencies.
Tip: Remember that mic placement cannot make a bad source sound good.
Mic Placement: Distance & Proximity Effect
Mic distance is one of the most crucial variables when it comes to positioning microphones. When we move a mic closer to the source, we get more direct sound and less room ambience, and the opposite is true when we move mics further away. However, some microphones, particularly with cardioid pickup patterns, introduce what is called the proximity effect, which increases low frequencies.
Close (0-10 cm / 0-4 inches): This produces a detailed sound that is tight and focused, which is ideal for isolation, but it can become unnatural if overused.
Mid or medium distance (20-60 cm / 8-24 inches): Provides a good balance of space and clarity, which is ideal for vocals and most acoustic instruments.
Distant (>1 m / >3 ft): To capture the depth and ambience of a room, which is often needed in orchestral recording.
Tip: Always consider the proximity effect when placing a mic close to a source. While it can introduce warmth, this can also become mud if overdone.
Mic Placement: Angle and Axis
The diaphragm of a microphone doesn’t exclusively capture sounds within the pickup zone. In fact, its response depends on the angle. A cardioid mic, for instance, has its most effective pickup area directly in front of the mic diaphragm (0 degrees), which is known as on-axis. Meanwhile, it will capture almost nothing at the opposite end (180 degrees), and we can use this off-axis zone to reduce bleed in multi-mic setups.
Science aside, the true position of the mic must produce a sound that suits the song you’re producing. So while there are guidelines, your instinct, taste, and feel become essential in the decision-making process. The obvious approach of directing the mic right at the source (on-axis) may produce detail and brightness, but by tilting the diaphragm (off-axis), we can reduce harshness and smooth high frequencies.
For example:
- For guitar amps, pointing the mic plum at the center of the speaker cone delivers a bright, lively sound.
- Meanwhile, angling the mic or pushing it to the edge gives a less aggressive and warmer sound.
- Learn more about Recording Guitar Amps
Tip: We can adjust the angle of the mic just like an EQ to enhance aspects of the frequency range.


Mic Placement: Room Interaction
Whether we like it or not, the room plays a role in every recording. This is primarily due to reflections from the walls, floor, and ceiling that interact with the sound source. If the room we’re using is not acoustically treated, this reflectivity can produce comb filtering and mud in the lower midrange and below.
To manage this:
- We can use close miking, which minimizes room interaction.
- Use the off-axis zone to nullify acoustic issues and move the mic away from reflective surfaces.
- Experiment by moving the source to a different part of the room or getting the performer to face in another direction. Corners, walls, and open areas all affect the sound differently.
Tip: In a great-sounding room, we can use more distant placement to leverage the space and enhance our recordings. Alternatively, we can use proximity and positioning to control the sound in an untreated environment.
Mic Placement: Practical Applications
Here are some different recording applications and ways we can approach the placement of the mics in each case.
Vocals:
Start by positioning the mic in line with the performer’s mouth, around 15-20 cm (6-8 inches) away. Be sure to use a pop shield and adjust the mic distance to achieve the tone you desire. Closer = more intimate, further away = more open. An off-axis tilt can reduce sibilance.
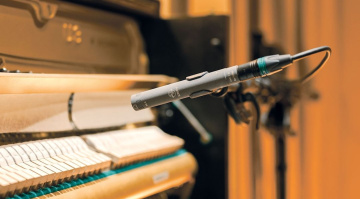
Acoustic Guitar:
Start by pointing the mic at the 12th fret, around 20-30 cm (8-12 inches) away. Closer = detail, further away = more balanced/natural. Stereo mic techniques like AB spaced pair, and ORTF also work well, using the 12th fret as the center of the stereo image.
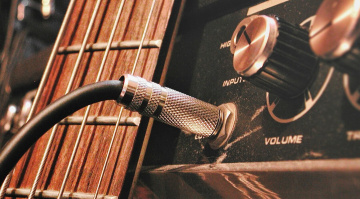
Electric Guitar Amp:
Push the mic up close to the amp’s grille, starting at the edge of the speaker cone. Then we can make slight adjustments by pushing the mic into the center of the speaker cone to add brightness or closer to the edge for warmth. While multiple mics can add tonal range and variety, we have to watch out for phase issues.
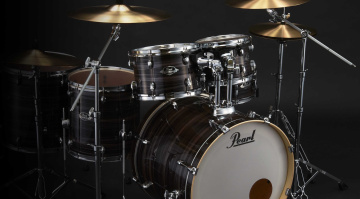
Drums:
- Kick Drum: Move the mic inside to add click/beater attack, or pull it back outside to add low-end punch.
- Snare: A few centimeters (an inch or two) above the rim of the snare, angled toward the center with the hi-hat in the off-axis zone (180 degrees)
- Overheads: Treat the drum kit as a single sound source, and use the technique (AB/XY/ORTF) or distance that suits the room and performance style.
- Learn about Recording Drums in Small Rooms
Mic Placement: Phase Awareness
It’s essential to be aware of phase relationships when working with multi-mic setups. If two microphones are placed around the same source at different distances, it results in a difference in phase between the two signals, which can cause cancellation.
To avoid phase problems, we can use the 3:1 rule, which means that the second mic must be three times the distance from the source compared to the first mic. Meanwhile, we can also check our mixes in mono to catch phase culprits early on.

Mic Placement: Creative Movement
Positioning a mic is not a static process. Instead, we need to move the mic around while listening on headphones, as this is one of the quickest methods to find the optimum mic position for a particular source. Remember that even with slight changes in the distance or angle of the mic diaphragm, we can make new tonal discoveries.
Try this exercise:
- Mic up the source (eg, guitar amp)
- Set your DAW to cycle record and play a simple loop or riff
- Adjust the mic between takes
- Compare the recorded takes
This can be done on your own at home, and through repetition, you can develop your ear for mic placement.
Conclusion
Mic placement is as much a science as it is an art form. While every application has a starting position, we get the best sounds from listening and adapting to the environment and performance. Only through experimentation can you reach the skill level where you trust your ears. Remember that perfection is not the aim; we are serving the song and the artist.
In today’s plugin-centric music production landscape, understanding mic placement is essential as we can avoid relying on post-production and become adept at capturing great performances.

FAQs
1. What is the best mic placement approach for vocal recording?
Generally, the best mic placement for vocals is to position the mic 15-20 cm (6-8 inches) from the performer’s mouth with a slight off-axis tilt and use a pop shield. This way, we reduce plosives and sibilance while achieving a balance of warmth and clarity. Also, pushing the mic closer creates a more intimate sound, while pulling the mic back opens it up more.
2. How does mic distance affect sound quality?
The distance between the mic and the sound source affects the clarity and tone of the signal being captured, as well as the amount of room ambience. Close miking provides detail, but the proximity effect can introduce unwanted low-end. Meanwhile, more distant miking will capture the ambience of the room. The key is to find the balance that suits your recording.
3. Where should you place a mic on a guitar amp?
When recording an electric guitar amp, the mic needs to be close to the speaker. At the center of the speaker cone, the tone is brighter and more aggressive, while it is slightly warmer towards the edge. Even with slight adjustments, we can change the tonal balance of the guitar sound.
4. What is the 3:1 rule in mic placement?
3:1 is a ratio that we can use to avoid phase issues when working with multiple mics on a single sound source. To follow the rule, the second mic needs to be three times the distance from the source as the first mic.
5. Why is the angle of the mic diaphragm important?
Because mics capture in 3D space and the pickup zones are not linear across the entire spectrum, the angle can affect the frequency response. With on-axis placement, we get more detail and brightness, while angling the mic off-axis can control harshness and smooth the high frequencies.
More Info:
*Note: This article contains affiliate links and product widgets that help us fund our site. Don’t worry: the price for you always stays the same! If you buy something through these links, we will receive a small commission. Thank you for your support!

This might also interest you