First Look Review: Moog Animoog Z for iPhone

Moog Animoog Z · Source: Robin Vincent
Moog Animoog Z · Source: Robin Vincent
Moog Animoog Z · Source: Robin Vincent
Moog Animoog Z · Source: Robin Vincent

Moog Animoog Z · Source: Robin Vincent
Moog Animoog Z · Source: Robin Vincent
Moog Animoog Z · Source: Robin Vincent
Moog Animoog Z · Source: Robin Vincent

Moog Animoog Z · Source: Robin Vincent
Moog Animoog Z · Source: Robin Vincent

Moog Animoog Z · Source: Robin Vincent


Animoog is 10 years old and at the time of release it set the bar for what a touch-controlled iOS-powered synthesizer could be. In the years since there have been plenty of contenders including Moog’s own Model D and Model 15 emulations but there’s something about the playability of the Animoog interface that keeps it floating around in anybody’s top 5 iOS synths.
So how are Moog going to improve upon it? What new features could they add to reinvent their Ansiotropic Synth Engine (ASE)? Well, they decided to give it a new dimension; Enter the Animoog Z.
For the purposes of this review Moog sent me a beta copy, which was as near to the final release version as you’ll get, and I ran it purely on an iPhone X because that’s the only compatible Apple device I own. So please note that if you’re using it on an iPad or on macOS then you will benefit from a larger and less fiddly interface and some neater views. So, this is the Animoog Z iPhone review!
Moog Animoog Z · Source: Robin Vincent
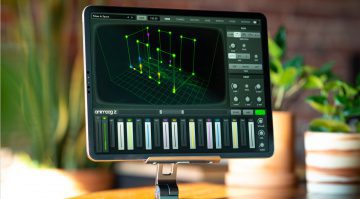
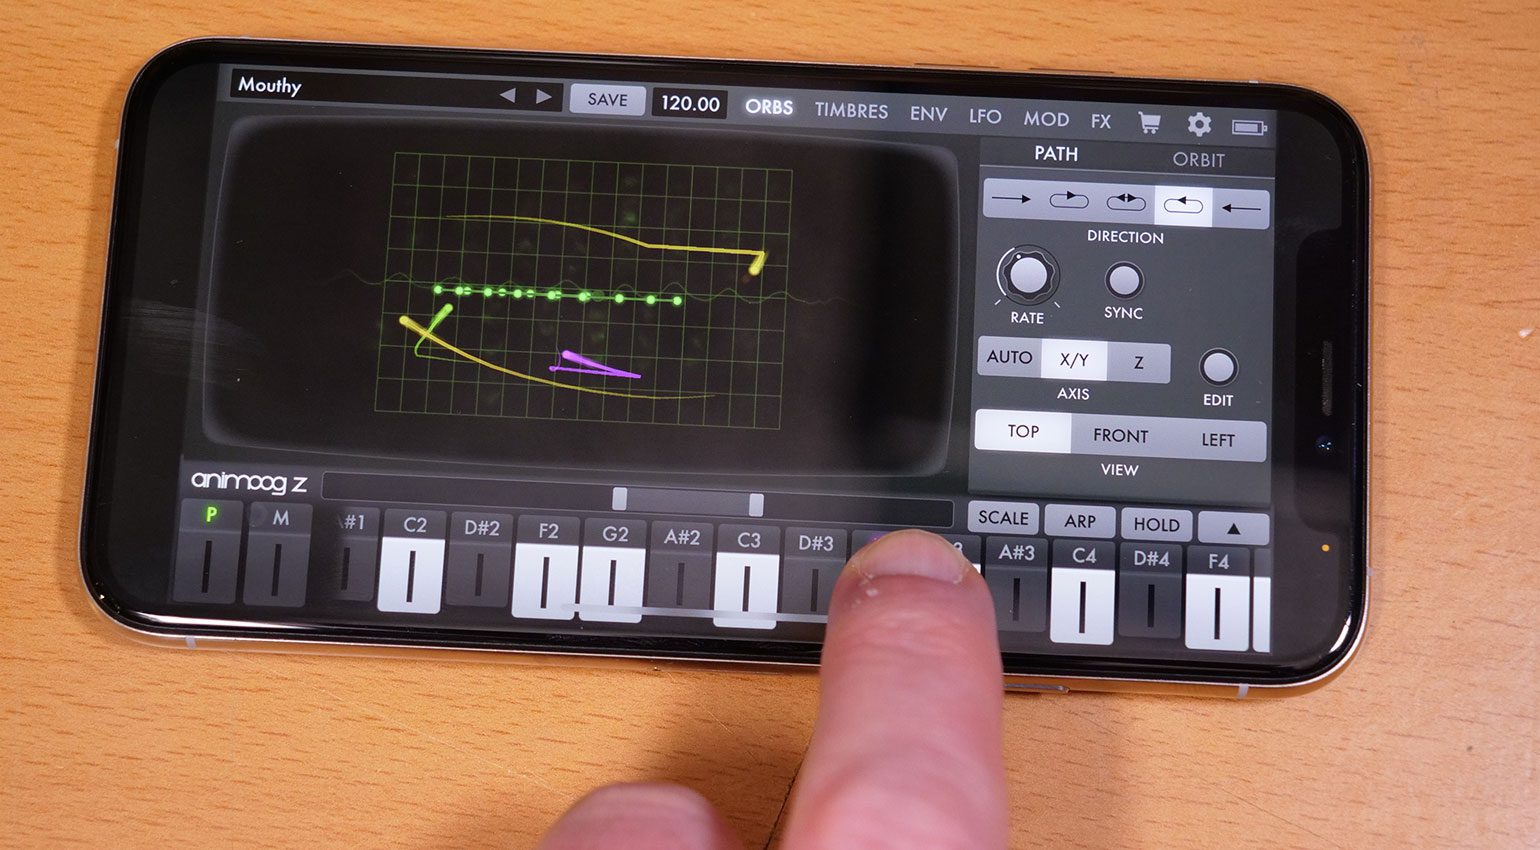
X, Y and Z
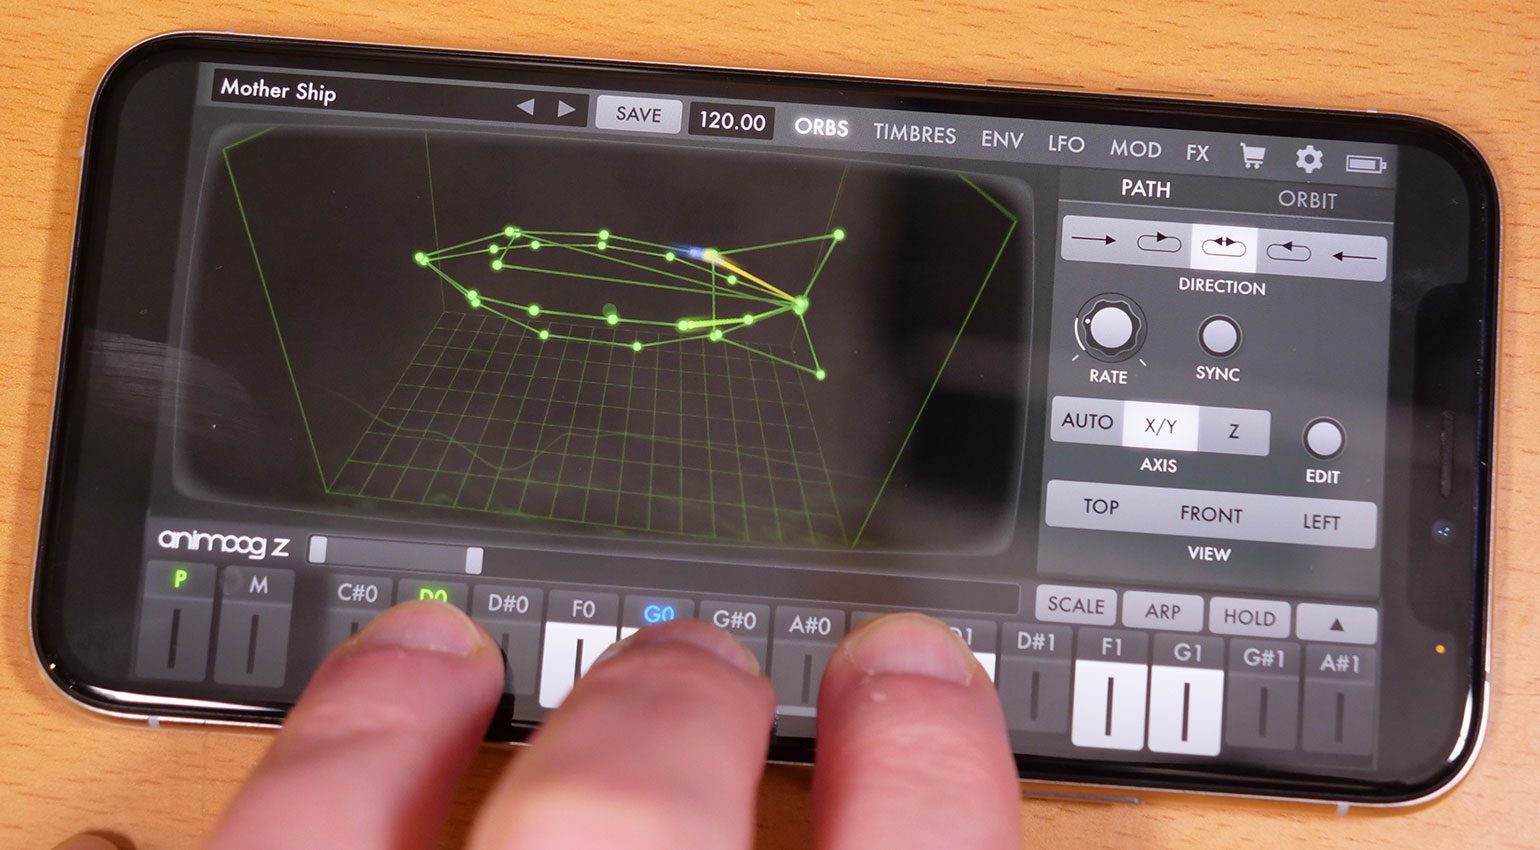
Ansiotropic is all about something having different qualities depending on the direction you view it from. In the original Animoog the ASE idea was that in the 2 dimensions of the XY pad you could have different sounds being generated depending on your path and movement through that pad. With Animoog Z Moog are pushing out the Z plane to give us a 3 dimension box in which find new and exciting pathways. The box is called the Wave Cube.
ASE works by using an 8 x 16 grid of waveforms. Each of the 8 rows on the Y-axis is a timbre (essentially a wavetable) and each timbre can hold up to 16 waves along the X-axis. So, potentially wherever you start your sound generation on the grid or in Moog talk, “place the point of Origin”, you’ll be creating a sound with a different waveform. As you create nodes and pathways in that space the sound moves on the grid and morphs between the different timbres and different waves within them. It’s that movement, that morphing of waves that gives Animoog its engagingly animated sound.
The Z plane gives us another point of view and adds more opportunities for waveshaping. Moog could have filled the 3D space with waveforms which probably would have made it too complex and unwieldy. Instead Moog uses the Z-axis to morph through the same grid of waves but in a different direction resulting in more movement and modulation.
Moog Animoog Z · Source: Robin Vincent
However, we still haven’t quite nailed it down because there’s some other cleverness going on with how the timbres and waveforms relate to one another. At any point in the Wave Cube the synth is blending and crossfading between two timbres and two waves. It’s like the waveforms in the next row are bleeding into the sound which makes for interesting waveshapes and also makes the ordering of your timbres very important.
Paths and Orbits
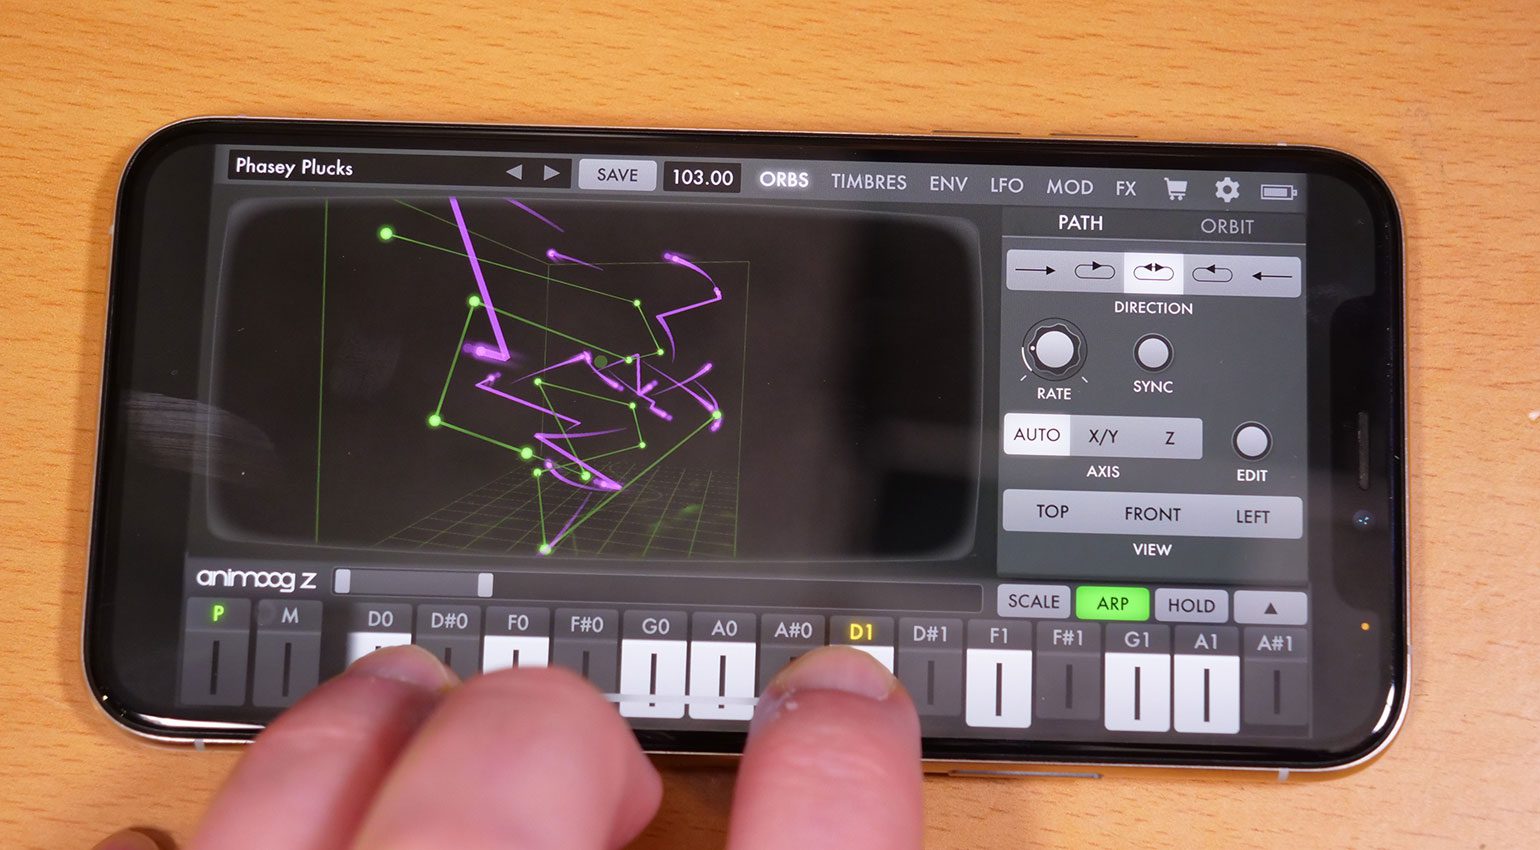
To take advantage of all this waveform morphing you need to get your sound moving. As you play a colourful dot appears in the Orb Wave Cube display and starts rocketing about the place. Moog calls these Comets and they follow paths and orbits in the 3D space.
On the right of the display are the Path and Orbit controls. You can add nodes to the Wave Cube with your fingers and pathways appear between them. You can specify a speed, direction or loop style and the Comets will dutifully follow the path for as long as a note is held. If you view the Wave Cube from the top it looks very much like the original Animoog with the XY grid and waveform display. Select the Front View and you’re looking into the 3D box. Using two fingers you can rotate around the box so that you can place nodes and pathways in all dimensions.
With the Orbit editor you can push the Comets off the pathway into an undulating orbit. You can specify a positive or negative amount of X, Y or Z which can send the Comets spiralling off into new journeys. The Z axis also has a Multiplier so it can travel at a different but related rate to the other two.
Moog Animoog Z · Source: Robin Vincent
Creating shapes and mapping out ideas is totally absorbing. It’s beautiful to watch these Comets find their way, moving through space and sound, it’s just lovely and we haven’t really worried about the sound yet. And as I play I can reach out with a finger and move the entire spatial system around within the Wave Cube finding new waveforms and combinations as well as modulating other parameters that have been tied to the grid.
Presets
The finished version will come with a whole bunch of presets from some fabulous sound designers and there will be more you can buy from the store. The presets that I have in the beta version are a complete joy. There are some classy synth sounds in here. We’ve got 16 voices to play with and so there are some lovely pads and keys in here that make the most of them. Some of them have the subtlest changes in waveform, the softest movements through wavetables. Others are much brassier, glassier, stabbier and full of attack. There are plucks, arpeggios, basses and leads aplenty. There’s also a sense that the effects are being leaned on quite heavily to keep the sounds lush and deep.
With Animoog Z I get the feeling that Moog has placed the emphasis on the wavetable side of the synthesis and the modulation of those rather than the more traditional synthesizer elements. In the original Animoog the filter was there right next to the Orb display whereas now we find it hidden away on the FX page. It’s the Paths and Orbits that takes the focus instead of the low pass filter.
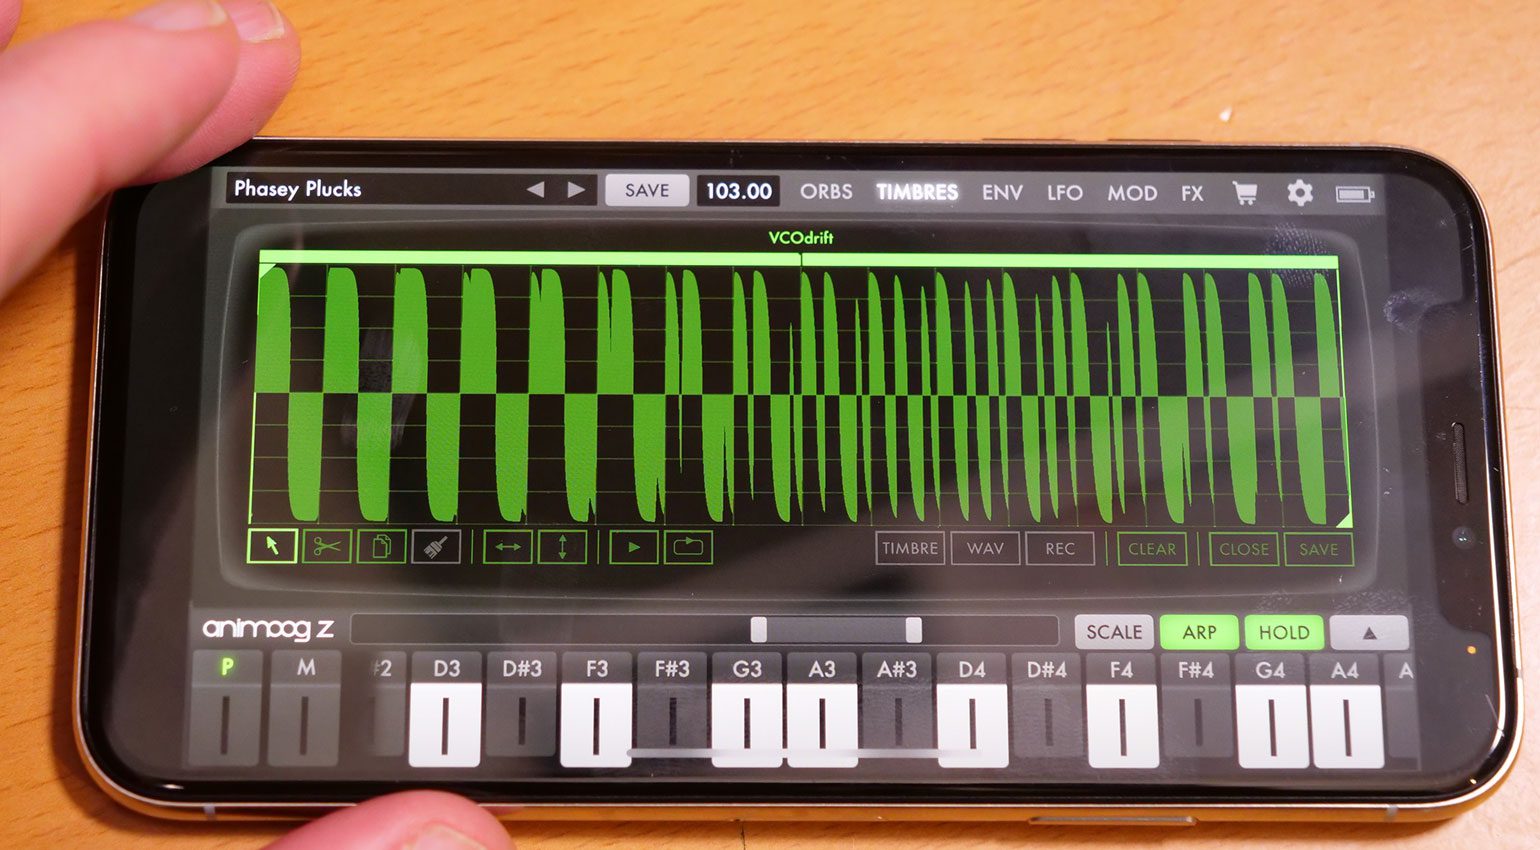
Timbres
This is where we get the sounds. We get to choose 8 timbres as the basis of our sound which gives us up to 128 waveforms. On the Timbres page you have your stack of 8 timbres on the left and the list of available timbres on the right. Timbres can be auditioned with a press before dropping them into the stack. Some are very varied, some more subtle and others are completely static which is what we find with the Default sound, which is also the familiar default preset on the original Animoog.
Moog Animoog Z · Source: Robin Vincent
There are plenty of timbres to play with here but they can also be edited and you can add your own. The editor is pretty simple giving you a display of the full wavetable on a grid of 16. Each of the 16 grid parts can have a completely different waveform or it can be a single waveform that changes over the 16 parts and everything in between. You can change the start and end points, gain, turn loop on or off and copy and paste the waves.
Recording or importing your own is where things can get really interesting. To import something all you need is a wave file and you can choose a point and it will pull in a tiny fragment as your waveform. Alternatively you can record direct into it from the iPhone’s microphone. This is not really “sampling” in a musical sense. The maximum size waveform it can use as a timbre is 1024 samples which is about 23ms. It’s a fun way to find new and interesting wavetables and textures rather than deliberate wave creation. You can fill up a Timbre with grabs from multiple recordings or imports and off you go.
Moog Animoog Z · Source: Robin Vincent
Synthesizer bits
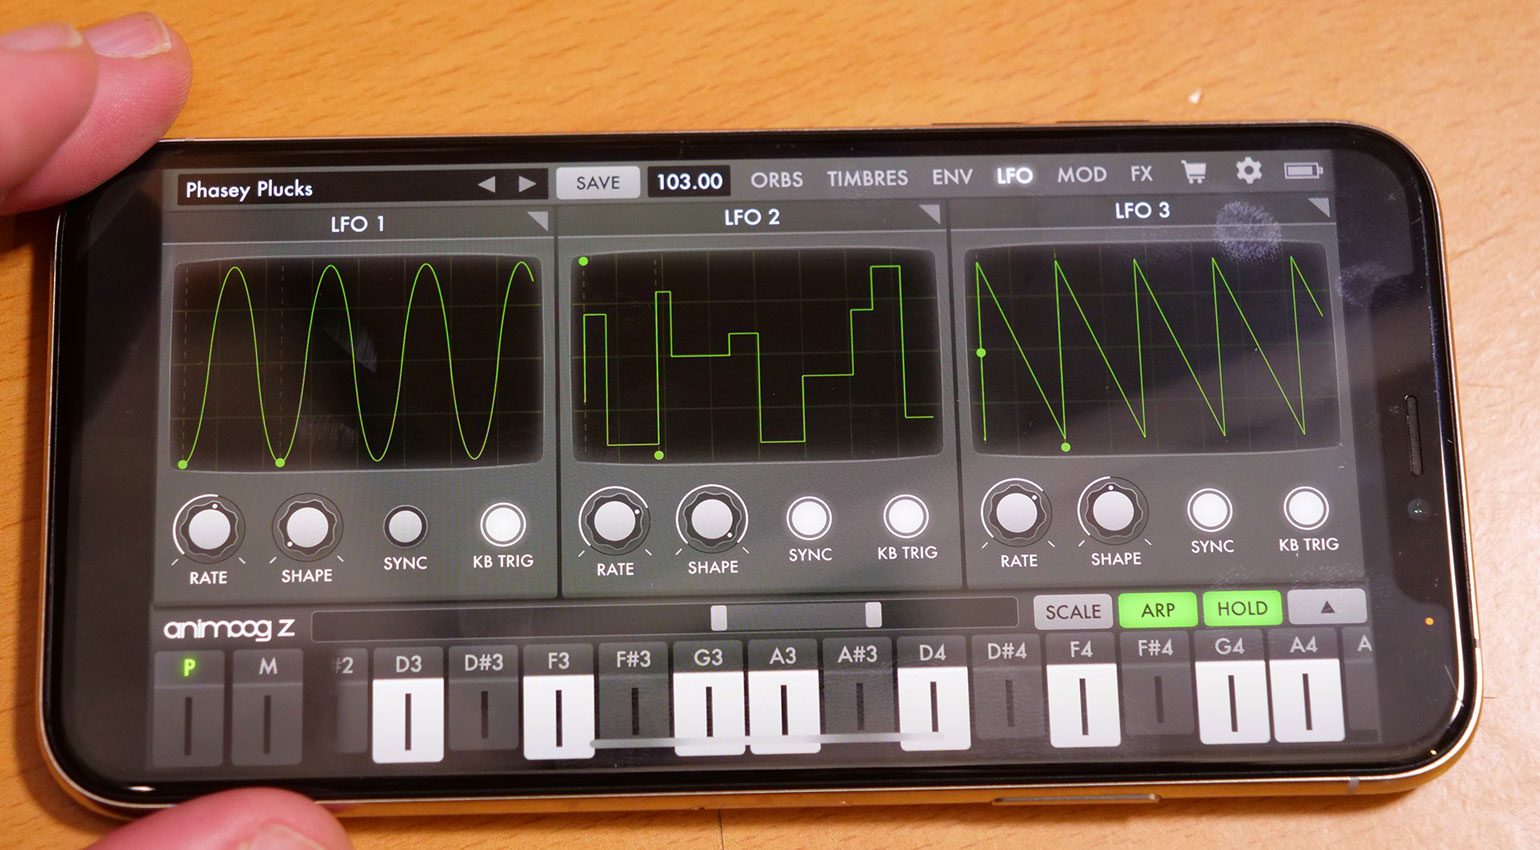
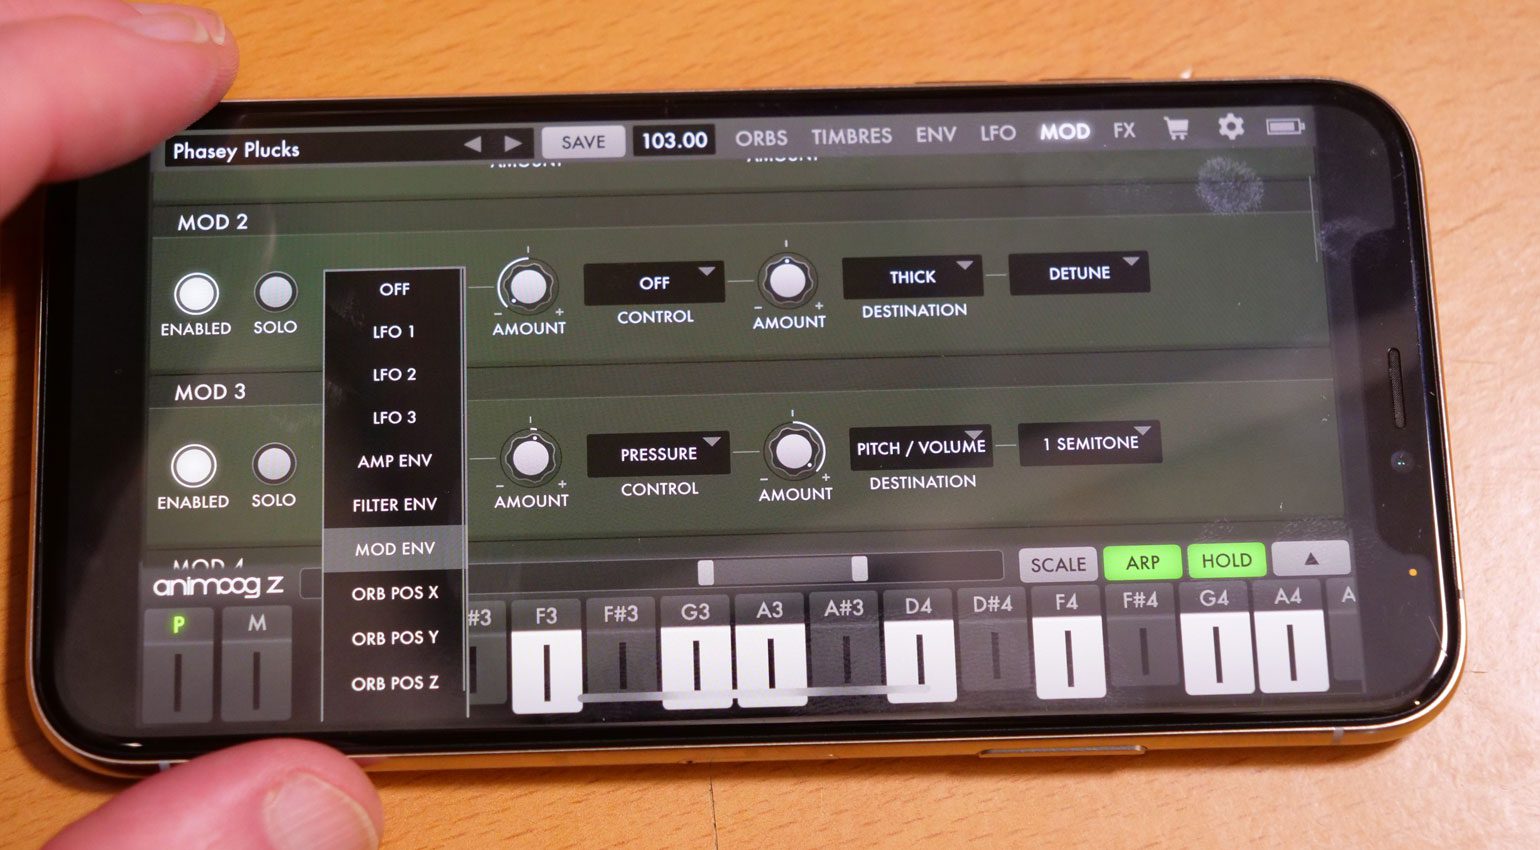
Beyond the timbres and wavetables we have a separate amp, filter and mod envelope with 5 stages and loads of detail including curves, delay and looping options. There are 3 LFOs with variable shapes, delay and up to 8 repeats which is always very interesting. Then there’s the 10 slot modulation matrix where you can choose the envelopes, LFOs or XYZ axis as sources and map them to the FX controls, LFOs or pitch and volume. Each source can also have a control placed upon it like pressure, velocity or the mod wheel which controls the amount of modulation going through.
Moog Animoog Z · Source: Robin Vincent
Controls that are given modulation get a little green “M” next to them and the modulation changes are shown in green around the knobs. This sort of modulation visualisation is something I really appreciate.
Moog Animoog Z · Source: Robin Vincent
FX
The effects section was on the front page of the Animoog whereas now it’s the last page at the back. There are 5 stomp-box style effects although really there are two effects plus an arpeggiator, filter and looper. I’ve seen a screenshot from the iPad version where it looks like you get a waveform display above each effect – that’s not present in the iPhone version.
The two effects include a Delay with echo and ping-pong options which does the job nicely, and Thick which is a really lovely bit crusher, overdrive and detuning effect that can introduce wobble, dissonance and chords.
Moog Animoog Z · Source: Robin Vincent
The Arpeggiator is straightforward and effective with 4 modes, latching, time divisions and Gate length control. The iPad version appears to give you a note display that might well be editable for creating your own patterns.
On to the filter which feels out of place here, you have three modes and some overdrive with the usual controls ready to go. The Looper is very cool and like the original Animoog it lets you record the sound of what you’re playing and then overdub with something else. You can quickly build up some rather interesting loops amongst lots of useless ones. After a few years Moog added an option 4-track recorder to Animoog. I wonder if they’ll add one to this.
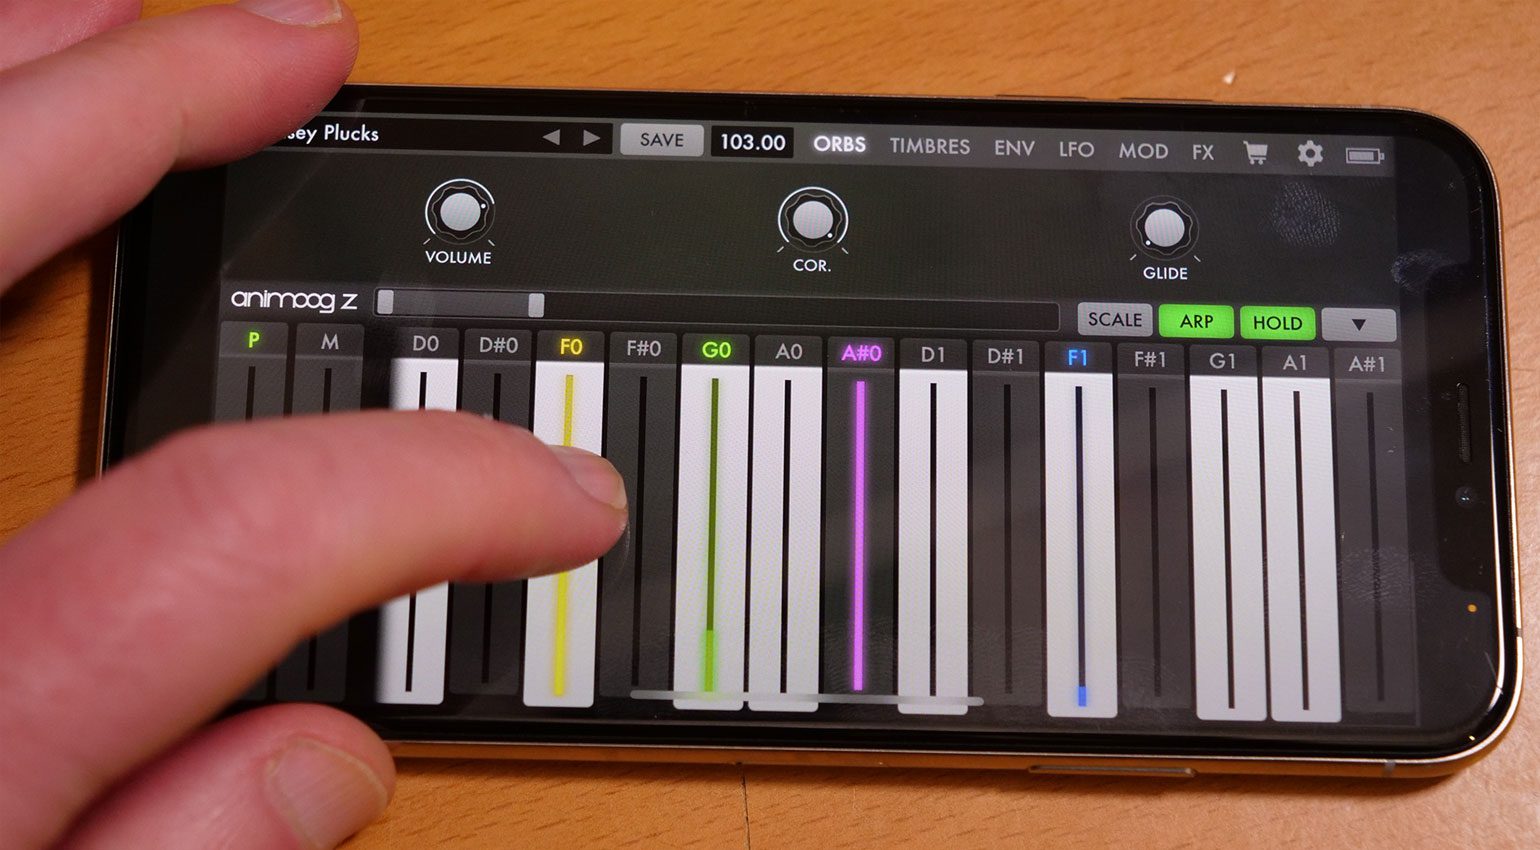
Playability
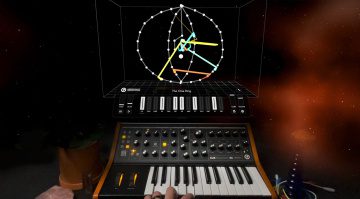
Performance is a key element of Animoog. If you check out the video of Suzanne Ciani playing with Animoog Z alongside her Buchla it’s the interaction that’s more important than the sound. The Orb invites you to manipulate the paths and orbits which in turn modulate the wavetables and effects. That’s really where the magic lies.
The keyboard also should not be underestimated. On an iPad the keyboard is magnificent, on an iPhone not so much. It’s fiddly, annoying and you find yourself accidentally swapping to your last app as you’re trying to manipulate it. You can make the keyboard bigger which is great but at the expense of losing the rest of the synth controls or display.
Moog Animoog Z · Source: Robin Vincent
However, what’s excellent about the keyboards is that you can lock it to scales, you can slide about and you push up and down to simulate pressure and that’s nearly always tied to something interesting. It’s one of the things you lose when adding a MIDI keyboard which seems like a good idea because of the fiddliness of the keys but then you wonder why the presets don’t sound as good. Attaching an MPE controller like the ROLI Seaboard will give you back your pressure sensitivity and makes for a fantastic solution.
Conclusion Moog Animoog Z
In a rudimentary way, there was something awesome about the look of the original Animoog. It felt vintage because it looked vintage. Moog has a massive amount of classy, old school currency and we buy into that every time. It’s simple things like the way the grid in the original was slightly distorted around the edges of the oscilloscope screen, the tangible impression of metal on the touch-plate keys, and the way the filter looked like a Moog filter. In Animoog Z Moog has stripped it all back to such a modern and smooth look that the filter looks like an afterthought in someone else’s plugin.
There’s an expectation with Moog that every product will have a vintage vibe and this has lost something in its modernisation which I think is a shame. That’s nothing to do with the sound, but I believe the styling of the interface, the way our eyes interpret our connection to an instrument and the sound it makes are really important in how we perceive the quality of a synth.
However, it sounds great. Really good. Solid, nice. I was expecting to experience a bit of my mind being blown but it’s not really that much different from the original because the sound engine is essentially the same. We have more movement, more morphing and more polyphony, so it’s capable of a wider range of tones. But it doesn’t blow similar synths out of the water like perhaps it did 10 years ago. But don’t get me wrong, it’s on par with the best of them.
Where Animoog Z exceeds is in the manipulation of wavetables and your finger pointing interaction with the paths and orbits. This is where the fun is to be had and the synth starts to show its quality. As an interactive software synth experience, as demonstrated by Suzanne Ciani, it’s completely brilliant. Some of that is captured on the iPhone but really you’re going to need an iPad to fully appreciate the combination of those touch-plate keys and interactive Wave Cube.
But, even on the iPhone it has such a joyful playability that I feel there’s no other synth quite like it. Animoog Z finds the near-perfect path between orbits of complexity and playability. I do miss the filter not being on the front though.
More information from Moog Music
Video
You are currently viewing a placeholder content from YouTube. To access the actual content, click the button below. Please note that doing so will share data with third-party providers.

This might also interest you