5 Beginner Microphone Mistakes – and How to Avoid Them!
 4,0 / 5,0 |
 Getting the most from your microphones doesn’t have to be difficult or expensive. Gearnews’ Bob Malkowski shares his advice on microphone technique and how to avoid the most common mic mistakes.
Microphone Mistakes and How to Avoid Them
Whilst browsing social media it occurred to me how many people find themselves in front of microphones nowadays. And there are a lot of first time microphone buyers making first-time mic mistakes! Microphones are no longer the sole preserve of recording studios or live stages. Microphones are now part of most people’s everyday lives and yet you’ll see a lot of common mic mistakes made every day.
But even if you’ve never used a microphone before, mic technique doesn’t have to be difficult. In fact, most of it is relatively common sense, costs nothing and can improve your results dramatically. Whether you’re a podcaster, a musician writing and recording at home, or a live sound engineer, these tips should help you get the best out of your microphones.
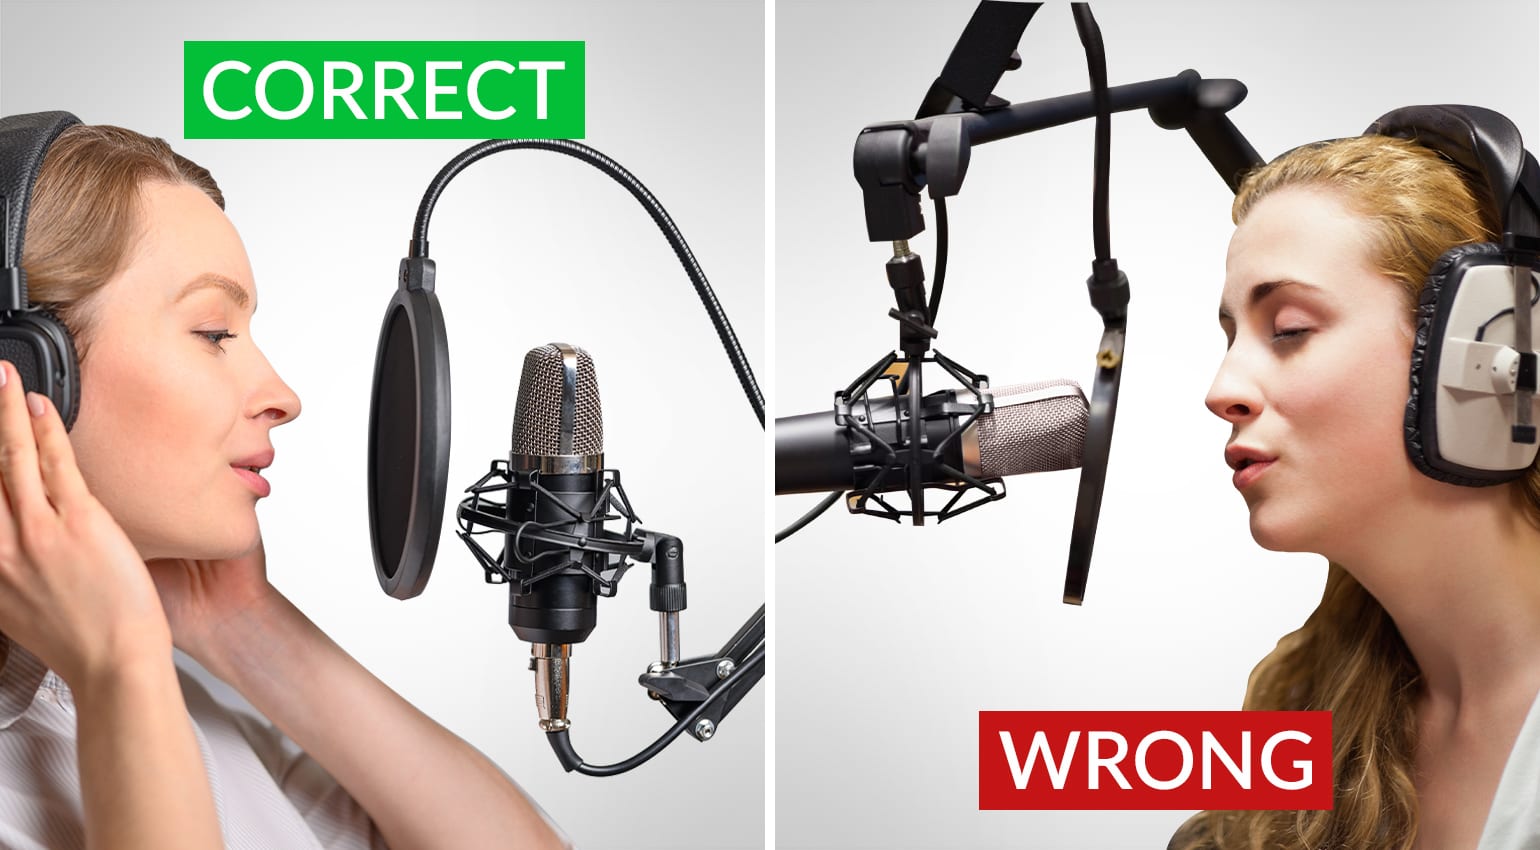
1. Talking into the wrong end of the mic
Of all the mic mistakes I see amongst first-time mic users, this one is by far the most common; in fact it’s one you see TV dramas get wrong regularly! But how do you know what end of the mic is the “right” end to talk into? Well, that depends on two things: the microphone polar pattern and whether your microphone is a side-address or end-address. Confused? Don’t be, it’s easy to tell and there are a few good rules of thumb you can use to tell what’s what.
As a very general rule, side-address microphones tend to be large diaphragm microphones like the Neumann U87. This means you place them upright and direct sound into the side (hence side-address) rather than the end. Let’s look at another classic microphone, the Shure SM58. This is an end-address microphone and is typical of most dynamic microphones; here you’ll direct sound into the end of the microphone.
Side address microphones · Source: Shutterstock/wavebreakmedia/Anton27
How do you know what end of the mic to “address”? With something like the SM58 it’s pretty obvious, but with a Large Diaphragm Condenser, it’s often less so. However, a good rule of thumb is that on an LDC the manufacturer’s logo will be on the side of the mic and facing towards you.
If you get these basic steps wrong, your sound will be thin, quiet and need way more gain than you’d expect. Another way of talking into the wrong end of the microphone is to talk into the rear of a large-diaphragm condenser microphone. “But wait, Bob, there’s a front and a rear to a mic as well?”. Yes, indeed there can be, and to understand that we need to learn about polar patterns…
2. Polar Pattern Perplexion!
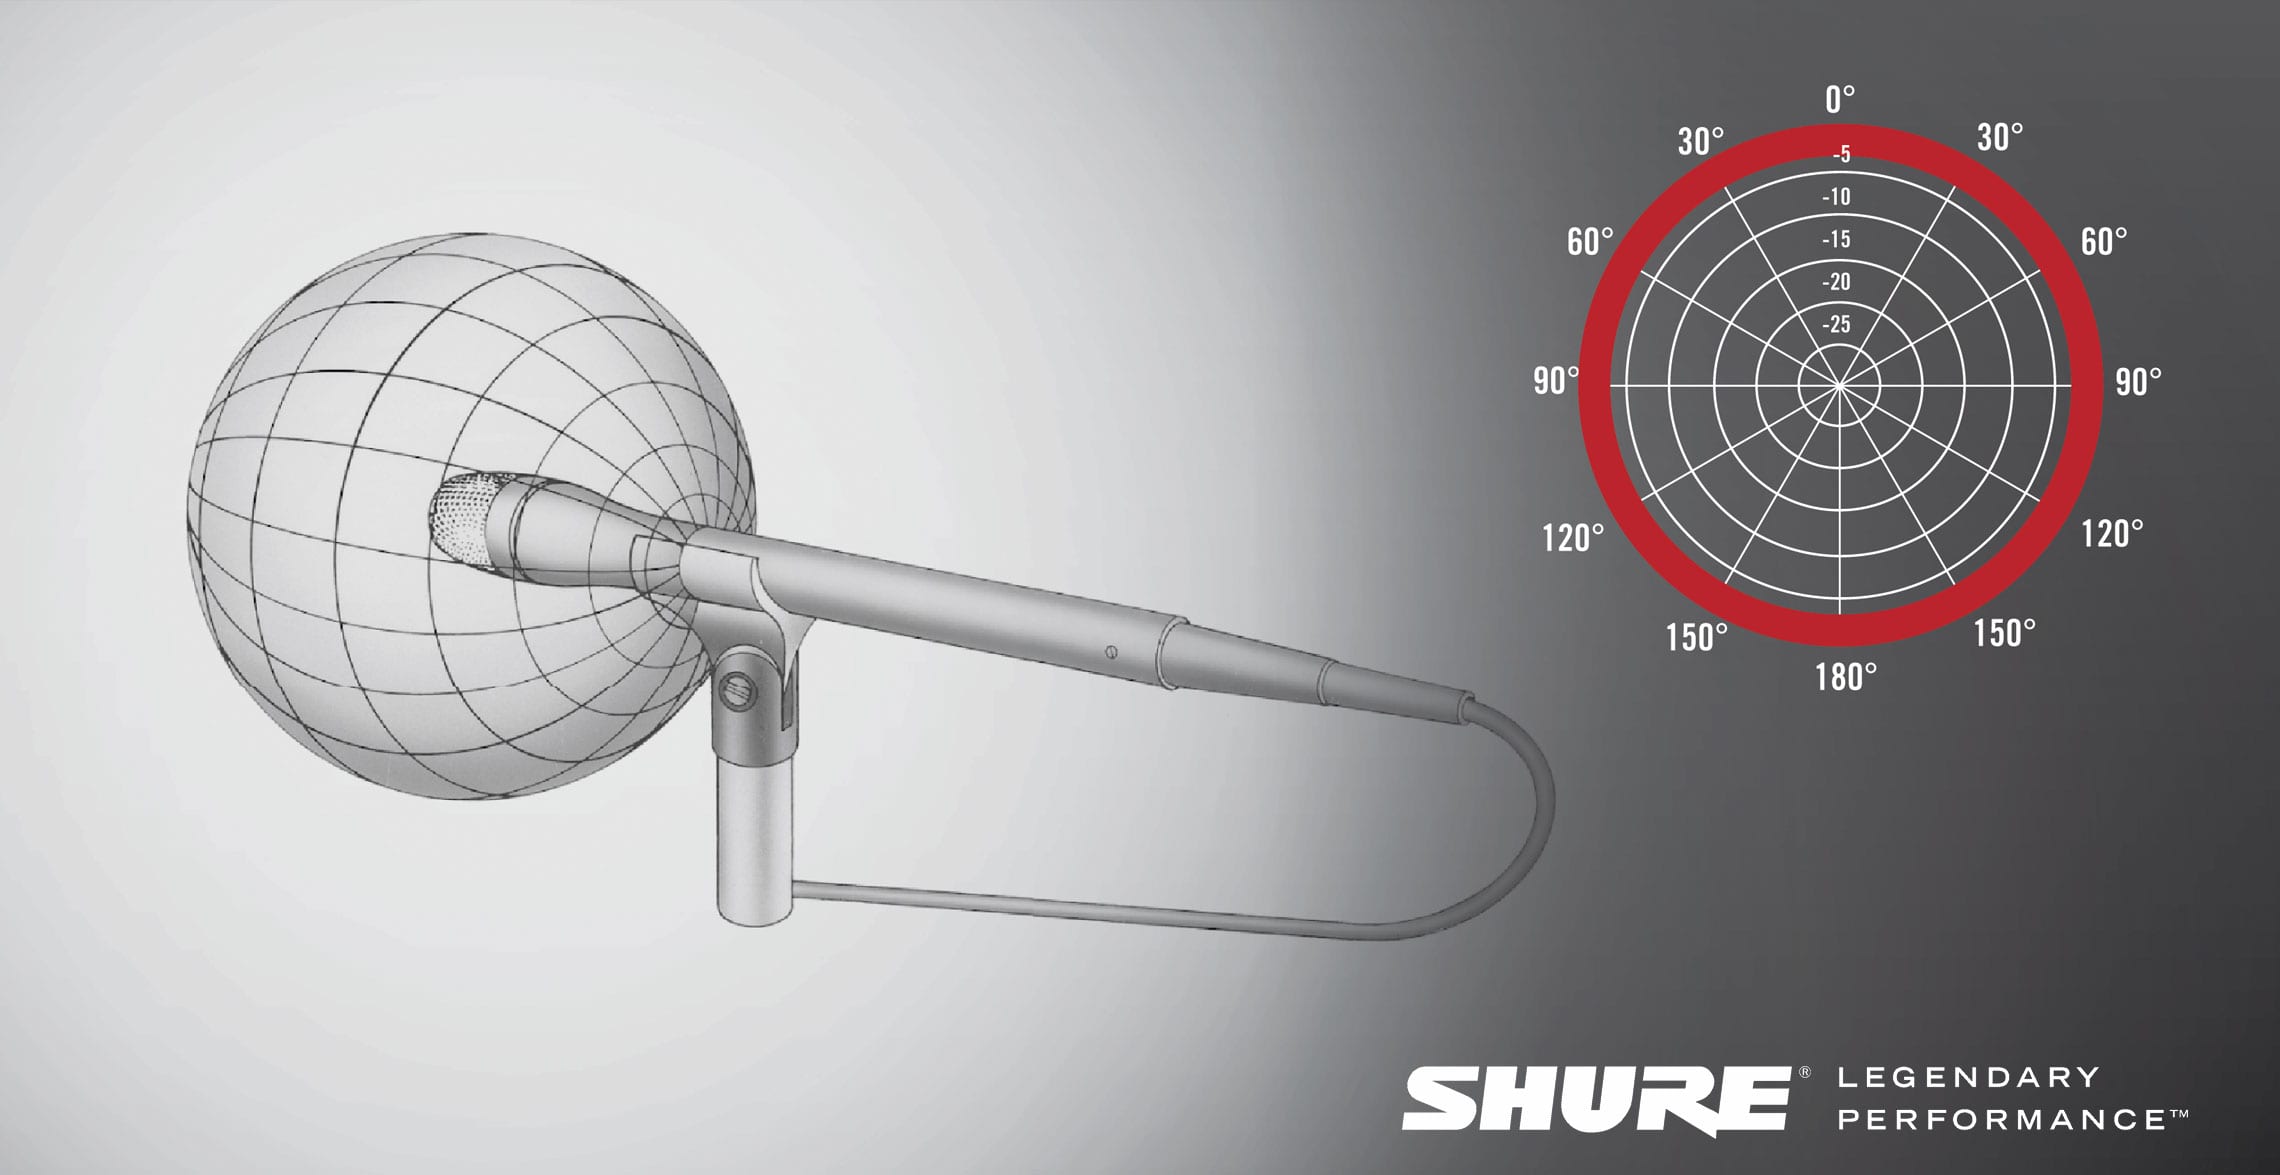
So what the heck is a polar pattern then? To put things simply, a polar pattern tells you what direction a microphone is most sensitive in. It’s very important to understand polar patterns as mastering their understanding and application can have a huge effect. For the purposes of this article, we’ll focus on the three most common polar patterns: cardioid, omni-directional and figure of 8.
Cardioid gets its name from the Greek for “heart” and if you look at it you can see that’s a roughly heart-shaped pattern. It’s also sometimes called “unidirectional” and that gives you a clue as to its usage. Cardioid microphones are directional, meaning they accept sound on-axis and reject it off-axis. Or, to put it in simple terms, they accept sound from the front and reject it from the rear!
Most vocal microphones and live microphones are cardioid microphones as they help alleviate feedback in loud environments.

Cardioid Polar Pattern · Source: SHURE
Omnidirectional microphones pick up sound from all directions. This means they’re bad for use in live sound but very useful for studio applications where you want to capture the sound of the room itself. Omni pick up patterns can also be great for “round table” recording where you may have multiple people gathered around one microphone (for example conference calls).
Omnidirectional Polar Pattern · Source: Shure
Figure of 8 gets its name from, well do we really need to explain this one? Figure of 8 is a specialised pick-up pattern but has some very useful applications such as stereo recording in a “Blumlein pair” and is also great for interviews. The BBC used Coles 4038 figure of 8 microphones for decades as an interview microphone for Radio4 and the World Service. Using one Figure 8 microphone placed between two people effectively does the job of two microphones. Clever eh?
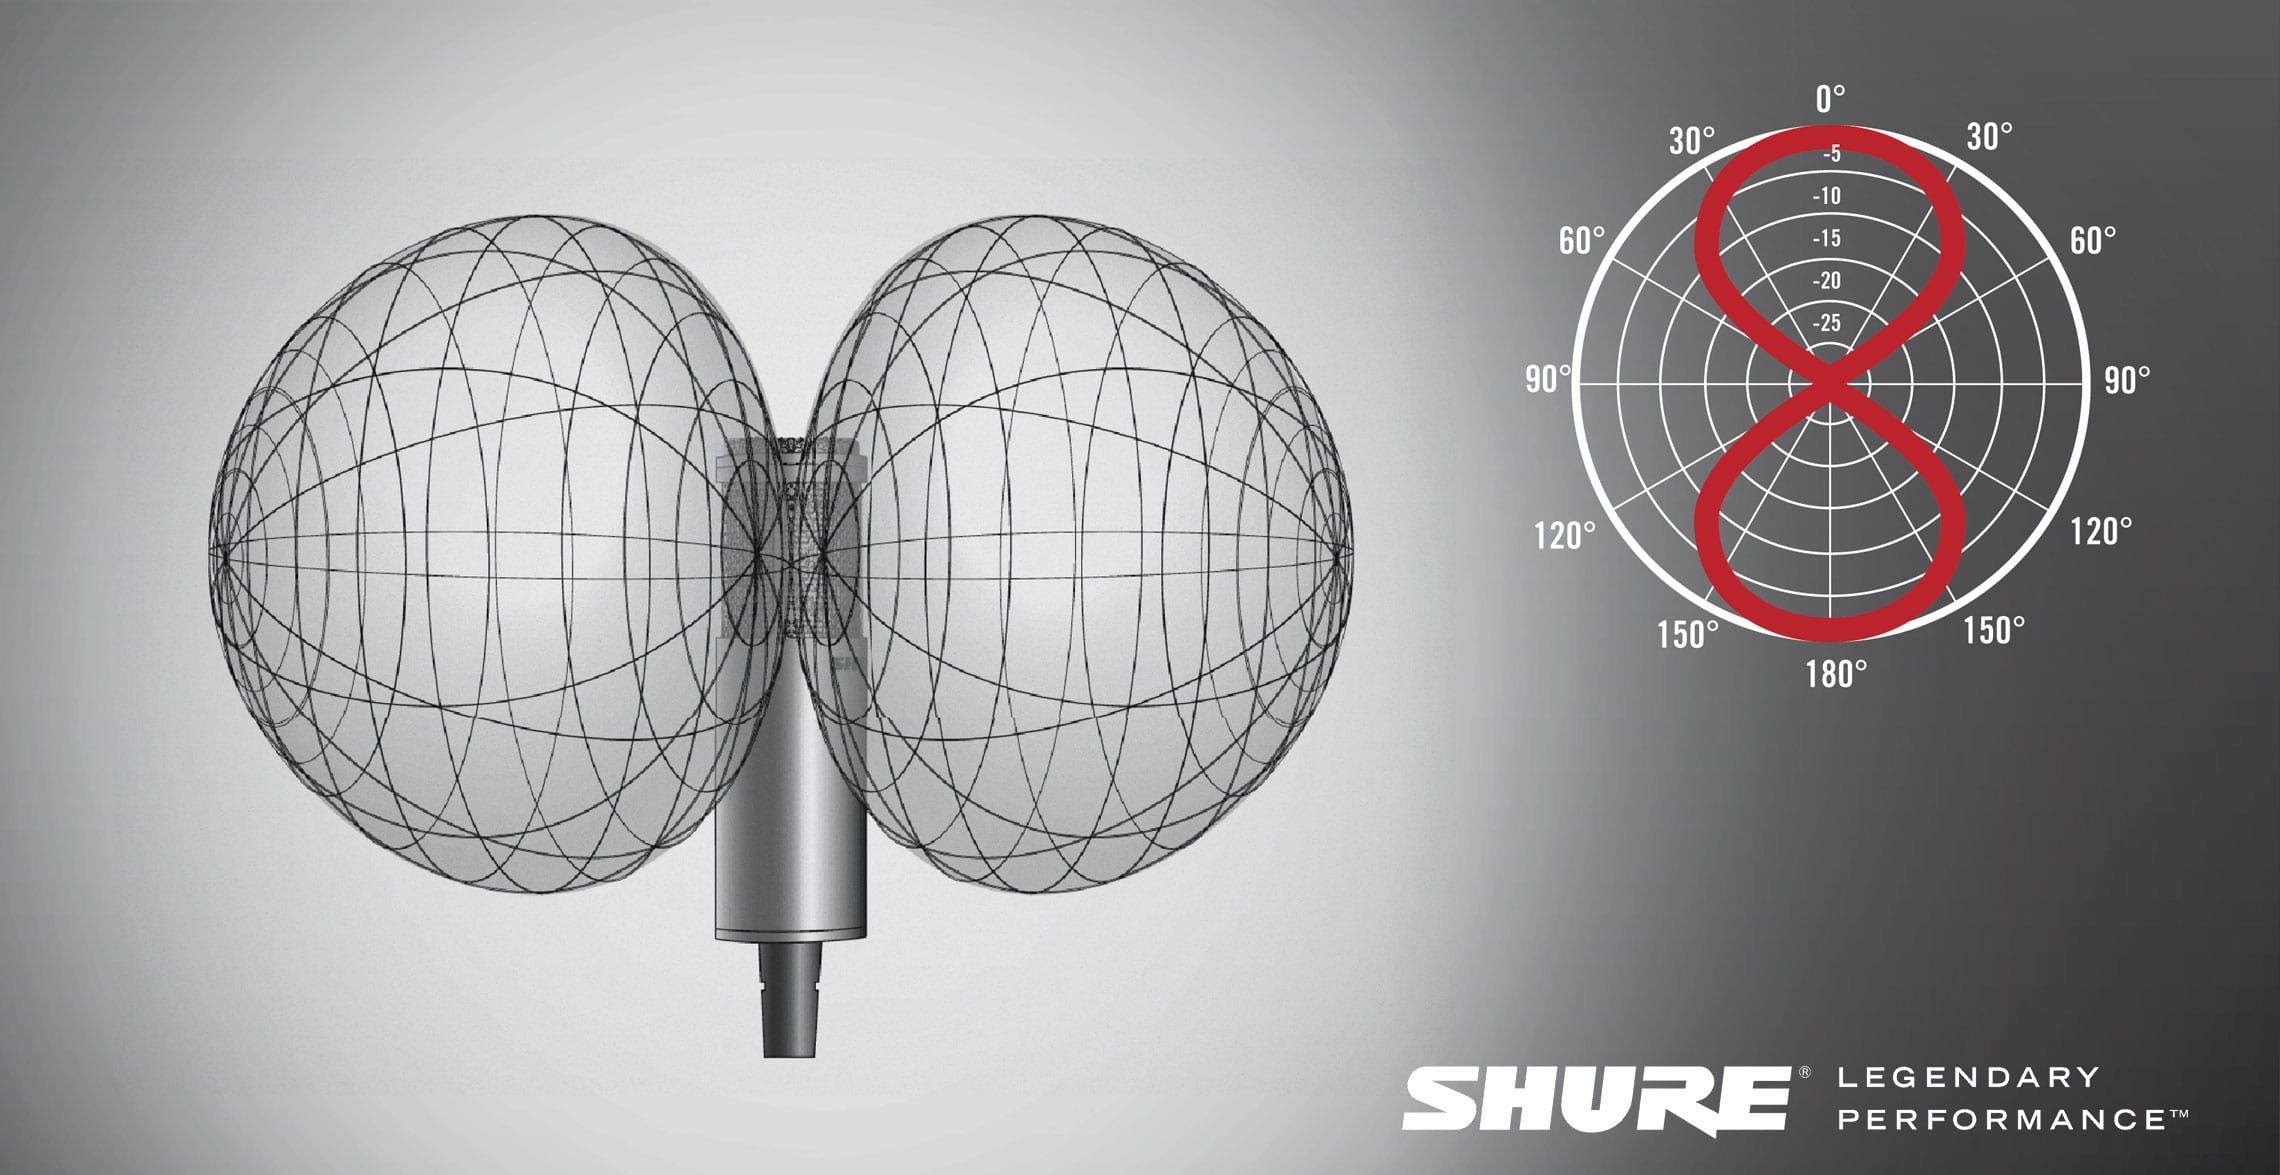
Source: Shure
3. Use the correct mic for the job.
In an age when anyone can afford a Large Diaphragm Condenser mic, it’s tempting to think using an LDC on every source is the best tool for the job. The truth is, that regardless of budget, sometimes a cheaper dynamic mic can do the job better. Also, there are applications where a dedicated instrument microphone is really the only way to mic up a source. But how do you know what mic to use for the job? Well, thankfully there are some useful approaches here:
- Condenser microphones are the most sensitive, brightest sounding and most physically fragile
- Dynamic microphones are less sensitive but most durable. Great for very loud sources and rough handling
- Small diaphragm microphones give a better transient response whereas large-diaphragm mics have a “smoother” sound.
Let’s look at a real-world example. If you were micing up drums, then you’d likely use dynamic microphones on the drums themselves with condenser mics on the cymbals and hi-hats. Just take a look at a typical microphone drum pack like the Sennheiser 600 drum set.
Ultimately, the right mic for the job is whatever sounds best, and that’s only something you’ll learn from experience. Why not borrow as many mics as you can for a weekend and try recording lots of different sources with different microphones? You’ll soon learn what sounds best on various instruments to your ears.
4. The “Amp Mic Dangle Dilemma”
How many times have you seen an SM58 or SM57 hung over the front of a guitar amp by its cable? It’s a practice that makes my skin itch for many reasons, and yet it’s one that seems alarmingly common. One of the big problems with doing this is that you’re placing the sound source (the amplifier’s speaker) totally off-axis to the mic capsule! The result? Your mic picks up reflections from the floor, and you get a washy, unfocused guitar sound lacking in bottom end.
So what’s the answer? Firstly, use a mic stand. Short mic stands are cheap enough nowadays that there’s really little excuse. There is however a microphone you can use properly by dangling over the front of an amplifier. The Sennheiser e906 is a side-address microphone, meaning the mic capsule will be on axis with the speaker when draped over the grille. Neat, huh? We’d still always recommend using a mic stand where possible though, as it allows for much more accurate mic placement.
You are currently viewing a placeholder content from YouTube. To access the actual content, click the button below. Please note that doing so will share data with third-party providers.
5. Cupping the mic
Oi! Singers! We’re looking at you with this one! Stop holding your mic by the ball of the mic, and hold it by the mic shaft as it’s meant to be held! You may not realise it, but by “cupping” the back of the mic, you’re dramatically affecting the microphone’s performance, sound and ability to reject feedback.
Don’t believe us? DPA microphones recently published an excellent article on the effects of cupping a cardioid vocal microphone. Just take a look at the effects on frequency response, listen to the recorded examples, and tell me cupping the mic isn’t a complete disaster! So, vocalists, do yourself and sound engineers a favour and stop cupping the mic! Your ears, engineer and audience will thank you!
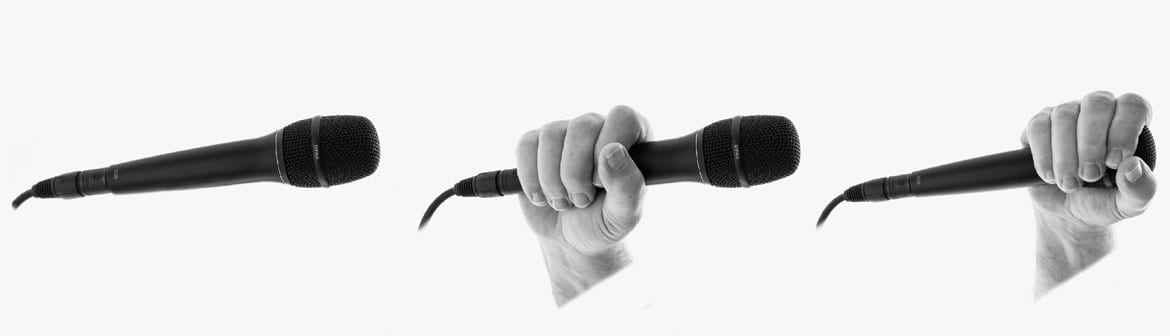
Proper hand placement on a vocal mic. · Source: DPA
This post contains affiliate links and/or widgets. When you buy a product via our affiliate partner, we receive a small commission that helps support what we do. Don’t worry, you pay the same price. Thanks for your support!


This might also interest you