Budget guitar recording, Pt. 3: Recording your guitar amp
Using microphone technique to achieve different results


This week, I will be going over some tips and tricks for recording your guitar at home. This follows on from where we left off last week. -now we are actually getting down to the process of capturing your desired guitar tones without spending a fortune on equipment.
To mic or not to mic? That is the question
Over the last two weeks, I’ve covered a few ‘core’ basics. Yes, some of it is a bit dull, but if your guitar plays well, your computer, tablet or digital four-track is ready and your room sounds as good as it can, you are ready to record!
Nowadays you can mic up your cabinet on your favourite guitar amp or you can go the software route and do everything in a virtual world. Or you could do both! Whether or not you can mic up a real guitar amp might depend on your environment: Can you turn up an amp? Do you have a microphone? Can you record without background noise ‘bleeding’ into your recording?
Make notes
I would suggest that you do what is best for you and experiment with amps, mic’ing and virtual amp settings. Do some test runs and make notes on your settings, perhaps marking the guitar grille cloth and mic stand positions with tape, or saving your own presets.
The more you practise this, the better you will get at achieving your tone. This sounds obvious, of course, but you would be surprised how many players just stick a mic in front of a cabinet and make no note of where it was or choose a random preset and then forget which one it was.
Headphones
If you have some good headphones, use them to ‘hear’ what your mic is picking up. By this I mean the room. Even if your guitar sounds amazing when you are stood away from your amp, the signal your mic is picking might not be so great. By monitoring the test recordings via headphones, you get to hear what is actually going on. Also, experiment with different speaker cones if your amp has more than one speaker, as they often sound different and one is usually better than the other.
I try and use small amps whenever possible, and if I want an overdriven tone, then I use them as loud as possible. Of course, you can always pile stuff on top of your amp like pillows / duvets and place them inside cupboards or wardrobes (as long as they don’t rattle) with the microphone. That will dampen the noise from the amp as you record.
Isolate
In the past, I’ve used under-stair cupboards and utility rooms to achieve this. This lets me crank the amp as loud as possible and not be in the same room getting deafened. This technique is good if you have neighbours that are out or very considerate, as it can get loud!
One of the best-recorded guitar solo tones I heard on record was achieved by my friend who used a mini battery operated Marshall stack with an SM57 microphone, placed them both in a bucket and then shoved a cushion on top to keep them in place. It sounded huge and you would never have guessed how he achieved that massive rock tone.
Double Track
Yes, everyone should know this technique. But I really do mean record it at least twice and not just cut and paste it to double up or use a plugin to achieve the result! Record your guitar parts more than once and then lay them alongside each other in your DAW, as it will give you a much fuller sound and more depth to your guitar parts.
Use the room
If you have the luxury to turn up loud or use a large room, then use it. I often set up another microphone to record the room sound to supplement my close-mic’d guitar cab. A large room will give you some sonic characteristics a plug-in just cannot achieve.
Corridors
You can also build corridors of sound, by taking sheets of wood or baffle to build a mini corridor. You then build a tunnel from the front of your amp and place a mic at the end of the tunnel and one up close to the cab. This allows you to get a controlled ambience from the second mic, and to control that ambience. Of course, if you have an actual corridor then you could use that as well! It will sound pretty lively, though, and may be hard to control.
Small vs. Large
Whenever I have an interesting sounding room or space, I will try to use it and get some great, unique sounds to get some character into my recordings. I really like small amps because they make it easier to place them in different locations in the room, achieving different tones.
Big amps can also be a lot of fun, but you often need somewhere you can really crank them up and so they get loud pretty quickly. On modern guitar amps you often have the option to turn them down with various attenuators. But they still push a lot of air, so expect to get a visit from the neighbours. You can use all the above techniques with large amps, but you may find you’ll need to find somewhere to actually use them at full volume – and that is probably not in your own home.
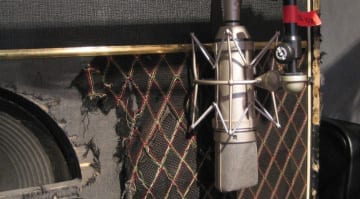
Axis
On-axis basically means pointing the mic directly at the speaker with no angle, so in effect, the mic would be considered to be perpendicular to the front of the cab. This tends to sound brighter. but there is a greater chance of proximity effect (booming, muffled or heavy bass overtones). Off-axis means angling the mic a little to the side. This can make the high end roll off a little and make things sound a little smoother.
Multiple Microphones
I mentioned using two mics earlier, one for ambience and another on the cab itself. Of course, you can use more than one on the cab and close mic them all. For good solid rock tones, you may actually want a nice dry sound where using more than one mic on a cab would make sense.
The ever-popular Shure SM57 works well with larger-diaphragm Sennheiser MD421, for example, and is a popular combination for many. Both are dynamic microphones and can handle loud guitar cabs with ease.
If you have access to a nice condenser microphone (borrow one from your mate) then do try it out as well. My personal favourite would be some variation on the classic, yet expensive AKG C414 or perhaps a more budget Rode NT-1. We’ll round up cheap alternative microphones another time, but I would say a cheap microphone positioned well, will always out perform an expensive one placed badly. So don’t get too hung up on microphone costs just yet.
Use the -10dB pad on the condensers if they have one. Expect a fuller bass response from these mics, as they are a lot more sensitive than the dynamic microphones like the SM57.
There is nothing to stop you using more mics, just be aware of phase issues.
Phase?
You have probably heard the term ‘Phase’, or perhaps even ‘Out Of Phase’. This is something you need to be aware of if you are using more than one microphone. If you are using multiple microphones, record your parts on a test run first. Each mic should be on a different channel in your DAW. Gradually turn up each mic one at a time to their optimal level and watch the output meter carefully as you do so. make sure they are adding and not subtracting as you add in each mic.
If they are detracting, then reverse the phase on the channel (there should be a button in your DAW for each channel strip to do this).
Now start playing with those faders and you will find as you adjust each one the sound will sweep and you have a fantastic, almost EQ-like sweep, as the phase relationship changes between the microphones. The more microphones you have, the more fun this becomes (or more complex, depending on your mind set). Again, make notes; you can learn a lot by playing with microphones and then adjusting the settings during a session.
Get on Youtube and watch some mic technique videos, as there are lots of great ones. Be prepared to experiment and make sure you take time to try out some of the ideas above. Above all, go and play, have fun! Meet me here next week and I will cover some software tips and tricks for your recording sessions.
You are currently viewing a placeholder content from YouTube. To access the actual content, click the button below. Please note that doing so will share data with third-party providers.
You are currently viewing a placeholder content from YouTube. To access the actual content, click the button below. Please note that doing so will share data with third-party providers.

This might also interest you