Craig’s Production Tips #1: Balancing mixes without level changes
Here are a few ways of balancing audio sources - without touching the volume fader

Hi folks! Angus here, the editor. We’re stoked to provide you with a new tips for music recording, mixing and production by industry veteran and all-round great guy, Craig Anderton. This column is aimed at musicians who may be missing a few tricks in the finer arts of working with audio. Here, Craig has some advice on drawing attention to and/or de-emphasizing individual sounds without adjusting the volume level. This balancing technique was new to me and I’ll be definitely be giving it a try on my next project. No matter how much I think I know, there’s always new things to try out. It’s part of what makes making music so fascinating – there’s so much more to learn! Take it away, Craig…
When mixing, the usual way to make an instrument stand out is to raise its level. But there are other ways to make an instrument leap out at you, or settle into the background, that don’t involve level in the usual sense. These options give you additional control over a mix.
Changing Start Times Changes Perceived Loudness
The ear is most interested in the first few hundred milliseconds of a sound, then moves on to the next sound. This may have roots that go way back into our history, when it was important to know if a new sound was leaves rustling in the wind—or a saber-tooth tiger looking for lunch.
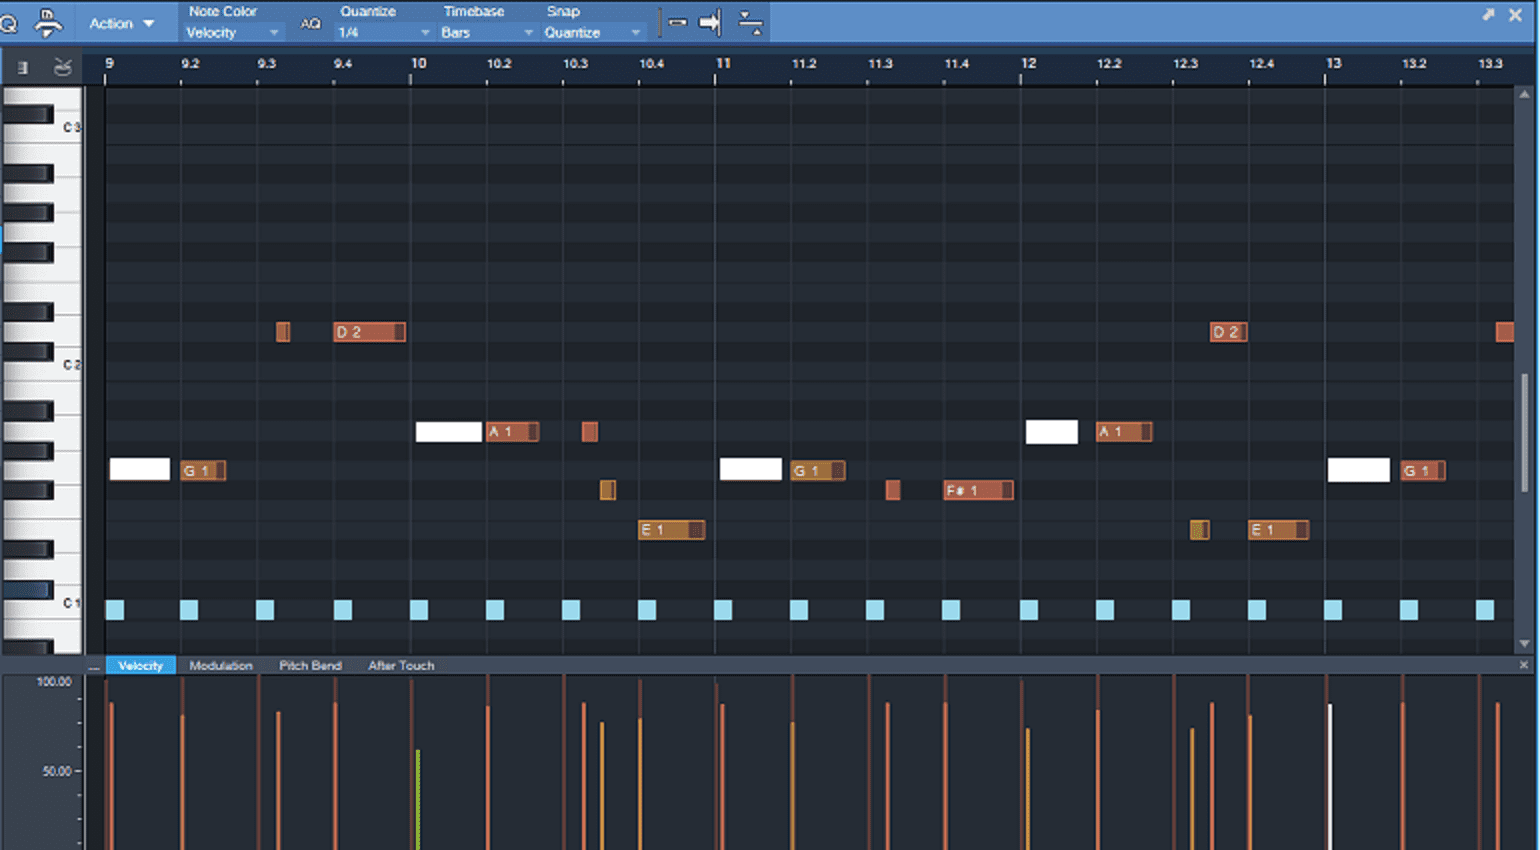
What happens during those first few hundred milliseconds affects the perception of how “loud” that signal is. If two sounds play at almost the same time, the one that started first will be more prominent. For example, suppose kick drum and bass hit at the same time. Move the bass a tiny bit ahead of the kick for a more melodic feel, or behind the kick to emphasize the rhythm.
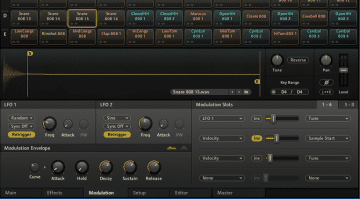
In the screen shot above, the light blue notes are a kick that lands right on the beat. The other notes are a bass line. The notes highlighted in white are behind the beat just a little bit to make sure the kick gets the focus—this makes the music feel more rhythmic than melodic. With MIDI sequencers, a track shift function can move the start time for selected notes. With hard disk recorders, you can grab a part on-screen and shift it, or use a “nudge” function (if available). Even a few milliseconds of shift can make a big difference.
Mixing Via Equalization
EQ is a very underutilized resource for mixing. Turning the treble down instead of the volume can bring a track more into the background without having it get “smaller,” just less “present.” A lot of engineers go for really bright sounds for instruments like acoustic guitars, then turn down the volume when the vocals come in (or some other solo happens). Try turning the brightness down a little bit instead. And of course, being able to automate EQ changes simplifies the process of making consistent changes.
Just remember that when mixing, you have options other than just changing levels—and implementing these kinds of changes can make a big difference to a mix’s “character.”
- Got any feedback on using these approaches in your mix? Drop us a line in the comments below!

This might also interest you
2 responses to “Craig’s Production Tips #1: Balancing mixes without level changes”
I think Propellerhead Reason users can do this easily by using the Regroove mixer. I have found it invaluable for stacking claps. -1 to +1 shifts can do wonders.
Working on the attack time of the sample in Kong Drum designer open new opportunities to sweeten your sounds too.
Thank you for the comment! Yes, the ReGroove mixer can definitely do this. This process works with any DAW that has MIDI, but the way to implement it varies. Some DAWs have menu items for nudging, with others, you need to move notes manually.